
It is not tough to setup mail server in Windows at all!
Since the existence of Internet, services of e-mail, file transferring and website have been there for decades. They were mostly established by companies and organizations. Starting year of 2000, DIY server became a trend and software developers started to release a variety of server wares.
Typical individuals are more likely to build their own FTP servers or web servers because such servers require less IT knowledge. Once created, a more immediate result can be achieved that users can transfer files and websites can be shown to the public almost instantly.
Even though social network, peer-to-peer communcation and video conference software have become readily convenient, for companies and enterprise, e-mail communication is still the most frequently used way to communicate each other. The reasons are that e-mail messages can easily be systematically backed up and retrieved for future reference.
Across platforms from Windows, Linux, Unix to Mac, there have always been paid or free mail server solutions available. For Windows platoform is perhaps more popular than others, let’s take a look on how to setup mail server on Windows at a breeze. We use EVO Mail Server as demo. It covers not only SMTP and POP3 protocoles but also IMAP, CalDAV and CardDAV services.
Before we begin, there are a few things worth of mentioning. Nowadays, lots of people still stick to POP3 when it comes to receiving e-mail messages on their client devices/software. However, if you have a Gmail or Outlook.com account, you may understand how convenient it is to manage mails in INBOX folder and sort them into different sub-folders accordingly. This sub folder sorting capability is what IMAP can provide. Yet, CalDAV/CardDAV enable users to synchronize calendars, tasks and global/domain/private contacts with their own client devices/software.
Now, let’s start from scratch:
- Pre-installation network environment
- Router and firewall configuration
- Hardware/software preparation
- Install and configure mail server software
- Start mail services
- Configuring CardDAV and CalDAV services
- Obtain CA-signed SSL certificate for EVO Mail Server
- Import CA-signed SSL certificate on EVO Mail Server
- Install EVOServ (ECM & Roundcube webmail)
- Configure SSL connection for EVOServ
- Add mail account via adding new account
- Add mail account via syncing AD or LDAP account
- Test on clients
.
STEP 1: Pre-installation network environment
.
Fixed or static IP address
Consult your local ISP on how to obtain a static IP address. Policy and regulartion may vary from one vendor to another depending on what type of Internet access plan you have.
.
Domain name and DNS settings
Once your server computer connects to Internet through PPPoE or direct connection, take care of your domain name and its DNS settings. If you already have your own domain name, then log in your domain name provider to configure DNS settings. If not, then you need to register a domain name via provider such as GoDaddy, which has full coverage on “how to” plus online chat staffs.
We at least need to configure 3 DNS records: (We use zoneedit.com DNS as an example in screenshots)
- A record – This record translates your mail server’s host name to the actual IP address where your mail server dwells and guides where incoming e-mail messages should go to. Anologically, A record acts as “your name – your phone number” in a phone directory.
- MX record – This record tells Internet which mail server is responsible for e-mail messages in and out of your domain/sub-domain. Anologically, MX record acts as your company’s phone operator responsible of handling incoming and outgoing phone calls.
- SPF record – This record is available for other mail servers to check what is your domain’s authorized mail server. It is an optional but strongly recommended for anti-spam purposes.
.
IP Reverse Resolution
For mail server’s IP, its reverse resolution value must be set, especially for company and enterprise. Why so? Mail service providers such as gmx.com, gmx.de and t-online.de always check whether IP reverse resolution value matches mail server host name of incoming e-mail messages. For example, value of mail.mydomain.com’s IP forward resolution value is 111.23.84.102. At the same time, IP reverse resolution value of 111.23.84.102 should be mail.mydomain.com.
The anti-spam strategy of matching IP and host name has gradually become a trend. In case of spammers faking [email protected] and sending spam mails from an IP address other than mydomain’s authorized mail server IP addresses, e-mails will be returned. Here is context of how error message would look like:
“554-mail.com (mxgmxus006) Nemesis ESMTP Service not available 554-No SMTP service 554-Bad DNS PTR resource record. 554 For explanation visithttp://postmaster.gmx.com/en/error-messages?ip=114.34.34.24 c=rdns”
Not only German brand mail service providers do so, but also others will follow up in the future. To obtain IP reverse resolution, contact your ISP for details.
.
STEP 2: Router and firewall configuration
Now, we are going to configure router and/or hardware firewall between LAN (Local Area Network) and Internet. There are mail-related parameters maintaining and regulating incoming and outgoing mail traffic.
.
DHCP Reservation
Mail server’s internal IP address must be static at all time. If not static, then mail server’s IP will most likely change upon router reboot or server reboot. Consequently, mail server’s internal IP in port forwarding setting and the actual mail server’s newly assigned internal IP no longer match. As a result, mail data connection will not go through.
It is a lot easier to make such DHCP reservation now because router keep track of host names and MAC addresses of PCs connected to it. Once mail server is selected from the list, precise MAC address will also be locked in.
.
Port Forwarding/Virtual Server
Normally, various types of data packets are exchanged between PCs or networks through IANA (Internet Assigned Numbers Authority)-assigned TCP or UDP ports accordingly. There is no exception for mail data.
TCP ports used by mail data exchange:
- Port 25 – SMTP / SMTP STARTTLS
- Port 80 – HTTP (Webmail)
- Port 110 – POP3
- Port 143 – IMAP4 (IMAP v4rev1)
- Port 443 – HTTPS (Webmail)
- Port 465 – SMTP SSL
- Port 587 – SMTP Submission
- Port 993 – IMAP4 SSL
- Port 995 – POP3 SSL
- Port 8008 – CardDAV & CalDAV
- Port 8443 – CalDAV SSL
- Port 8843 – CardDAV SSL
Configuration methods of different router brands may vary. However, keywords are usually Port Forwarding or Virtual Server. Steps are as below:
- Enter name of port forwarding, such as Port 25
- Enter 25 for internally mapped port number
- Enter 25 for exterinally mapped port number
- Enter mail server’s internal IP address, which is the DHCP reserved IP we configured previously
- Repeat step 1 to step 4 for rest of the ports listed above
If there is any third-party hardware firewall, such as FortiGate, similar port-forwarding or port-redirection as above, then it also has to be configured. Refer to user manual of your firewal device on how to make such arrangement. At the same time, it is suggested to turn off antivirus feature scanning mail data because such operation may alter mail content and prevent mail delivery from time to time due to corrupted headers within e-mail messages.
.
STEP 3: Hardware/software preparation
.
Computer Hardware
Typical CPU and RAM should be sufficient to handle the job. What it really matters is deployment of SSD drives.
- Intel i7 or i5 CPU – i7 is optimal and i5 is minimum.
- 4GB to 8GB RAM – 8GB is optimal and 4GB is minimum.
- Mail storage – The bigger the better. Recommended configuration is: 120GB SSD (Solid State Drive) for operating system, 512GB SSD for mail data, 2TB conventional hard disk for mail archive.
.
Operating system
The mail server software we use in this tutorial is EVO Mail Server and it is compatible with Windows 7, 8.1 and 10 as well as Windows Server 2008, 2012 and 2016. There is a more advanced configuration method by deploying VMWare Workstation. The reason behind it is that virtual Windows image can be periodically backed up. When production server hardware or image is failing, backup image can immediately take over by running it on another spare PC to lower server offline risk. Steps are below:
- Install Windows on physical disk first.
- Install VMWare Workstation on top of it.
- Install another virtual Windows within VMWare Workstation.
- Build mail server in the virutal Windows.
.
Antivirus software
EVO Mail Server currently can only work with ESET antivirus software because ESET provides command line scanning tool. For Windows 7, 8.1 and 10, use ESET NOD32 Antivirus. For Windows Server, use ESET File Security for Microsoft Windows Server. Two parameters inside ESET antivirus software must be disabled to avoid false scan result:
- Browse to Email protection under Antivirus and antispyware and uncheck the scanning feature.
- Browse to Exclusions under Antivirus and antispyware. Add paths of EVO Mail Server data folders and EVO Mail Server program file folders:
- C:\Program Files\EVO Software Production\
- C:\ProgramData\EvoMailServer\
.
STEP 4: Install and configure mail server software
.
Start Mail Services (using mydomain.com in the demo)
So far, pre-installation environment is ready. We will continue to install and configure EVO Mail Server from scratch as well as testing sending/receiving e-mail messages.
- Software to download:
- EVO Mail Server Download Link: 64bit / 32bit
- ECA (EVO Collaboration Add-on) will be downloaded and installed automatically during CardDAV and CalDAV configuration.
- EVOServ Download Link
- Microsoft Visual C++ 2008 Redistributable Package (x86) Download Link
- Microsoft Visual C++ 2010 SP1 Redistributable Package (x86) Download Link
- Visual C++ Redistributable for Visual Studio 2012 Update 4 Download Link
- Visual C++ Redistributable for Visual Studio 2015 Download Link
- Install all redistributable packages mentioned in Step #1.
- Run downloaded evoms.msi or evoms64.msi based on bit-version of your Windows OS. A UAC prompt may pop up. Click on YES to continue starting mail services.
- Run EVO Mail Server GUI by double-clicking on its icon.

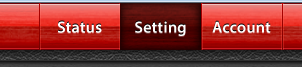
- Click on Setting tab.
- Click on Advanced button to change the configuration mode.

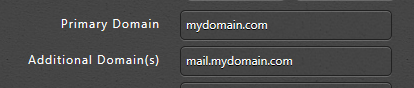
- Next to Basic Setting / Primary Domain, enter your domain name such as mydomain.com. Next to Additional Domain(s), enter host name that you put down in your MX record, such as mail.mydomain.com (For purpose of obtaining CA-signed SSL certificate).
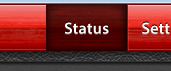
- Click on Status tab.
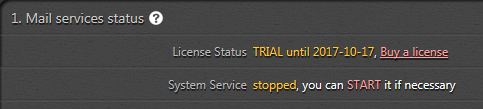
- Click on START in 1. Mail services status section to start mail services.
- Scroll down to bottom and click on Add to exception list next to Windows Firewall.

- Click on OK in the reminder twice.
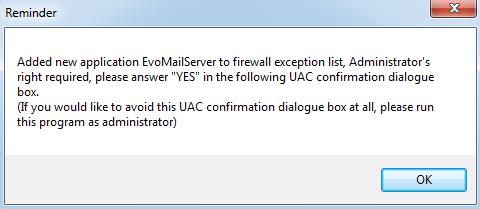
- Windows Firewall section will show that all essential ports are opened and through.

- Open Computer Management, click on Services and scroll down to bottom. Open World Wide Web Publishing Service Properties. Set Startup type to Disable and Service status to Stop.
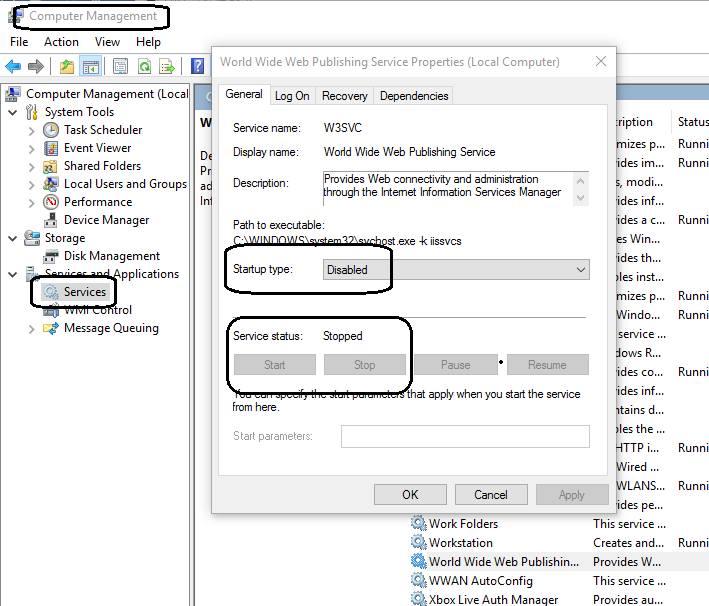
- The sole purpose of Step #12 is to preserve Port 80 for running Roundcube Webmail. If Skype, Teamviewer or any other software that uses Port 80 is installed in the mail server computer, please re-assign the port for these applications.
.
Configuring CardDAV & CalDAV (For EVO Mail Server Prime Edition Only)
CardDAV & CalDAV services enable users to synchronize their contacts, calendars and tasks on their PCs, mobile devices and tablets.
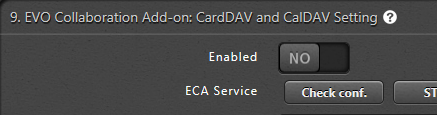
- Click on Setting tab and scroll down to 9. EVO Collaboration Add-on: CardDAV and CalDAV Settings. Click on Check Conf button and hit OK in the reminder.
- If MS Visual C+ 2008, 2010, 2012 & 2015 Redistributable Packages have previously been installed, then we can skip this step.
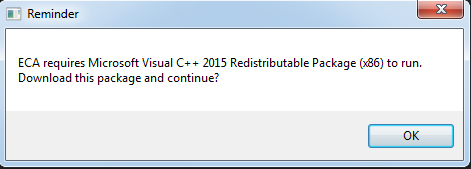
- Following VC++ 2008, 2010, 2012 & 2015 Redistributable Package installation, click on YES in the ECA download reminder.
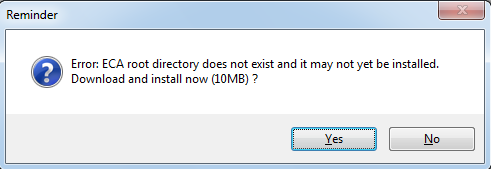
- EVO Mail Server will automatically download ECA on a web browser.
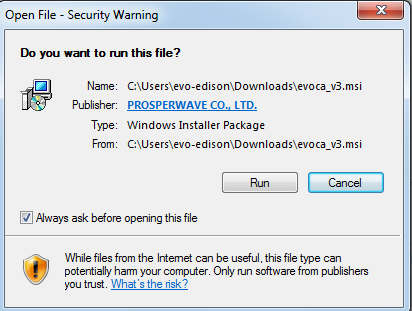
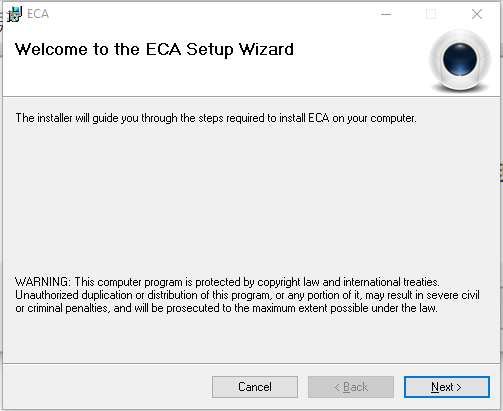
- Proceed ECA installation.
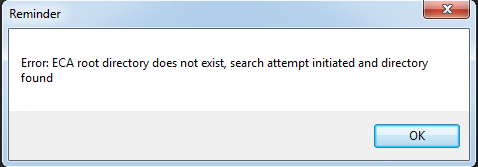
- Click on Check Config. button again. Now, ECA root folder is found and click on OK to continue.
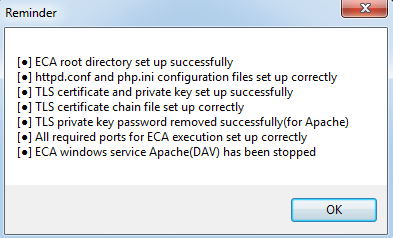
- Click on Check Configs. button once again. A reminder displays all configuration status but ECA windows service Apache(DAV) has been stopped.
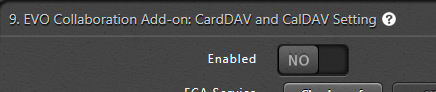
- Now, click on Enabled switch to YES. Now, Windows Security Alert may pop up and click on YES.
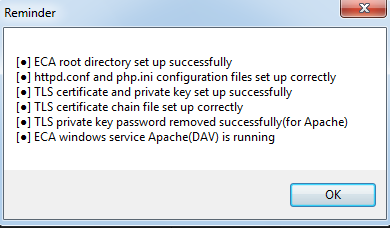
- Click on Check Configs. button once again to double check. A reminder displays ECA windows service Apache(DAV) is running.
- Now, click on OK.
.
Obtain a CA-signed certificate for EVO Mail Server (using mydomain.com in the demo)
The following steps guide you through to obtain a CA-signed certificate to further enhance client-to-server and server-to-server connection security.
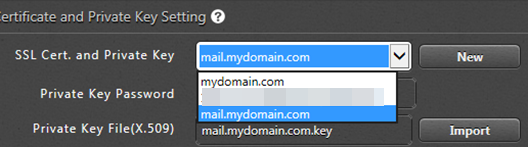
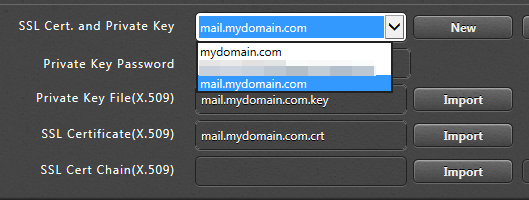
- Click on Setting tab and scroll down to 6. SSL(TLS) Certificate and Private Key Setting. (The following example will be using mydomain.com as the domain name)
- In SSL Cert. and Private Key pull-down list, select mail.mydomain.com, which is the MX host name back in step 7 of Install and configure mail server software.
- Click on New and there will be a form to be filled out.
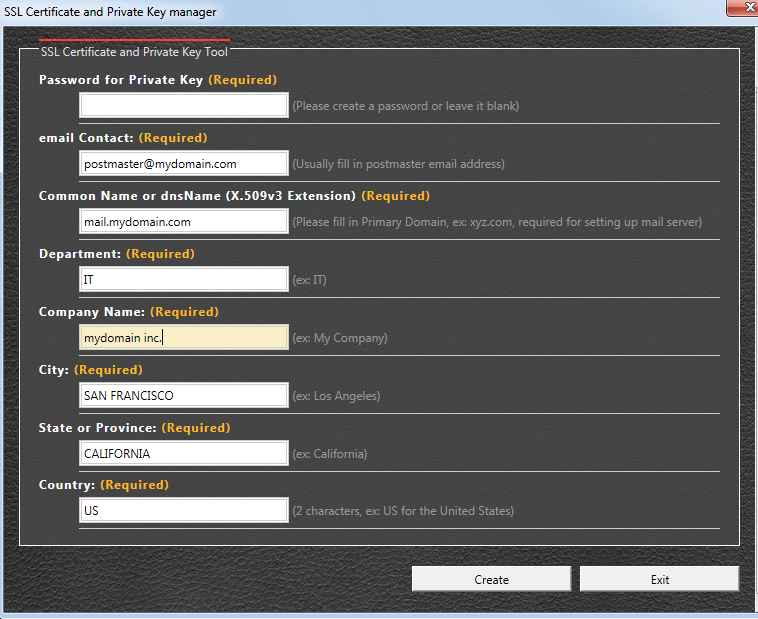
- Common Name is already filled in and complete other fields about company.
- Click on Create button to create certificate and private key.
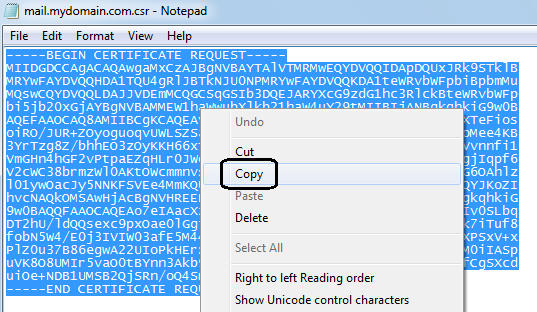
- Click on Show CSR.
- Select the whole content in Notepad and copy it and we will use it in step 10.
- On a web browser, go to http://www.ksoftware.net/. Click on Web Server SSL Certificates.

- Click on Buy button next to Comodo PositiveSSL Certificates.
- In blank area next to 1. Copy and paste your CSR into this box:, paste in CSR from step 7.
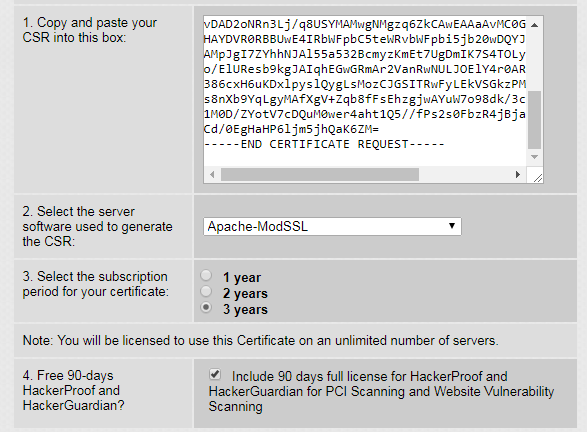
- Next to 2. Select the server software used to generate the CSR:, select Apache-ModSSL.
- Next to 3. Select the subscription period for your certificate:, select subscription period up to 3 years. It is suggested to get 3 years that will save you trouble from annual renewal in the future.
- Skip 4. Free 90-days HackerProof and HackerGuardian? If you like and click on Next >.
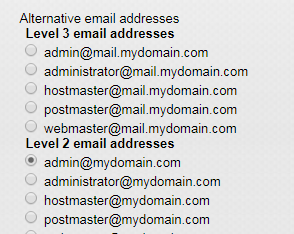
- On Domain Control Validator page, choose [email protected] as the validation e-mail account and click on Continue > to go on.
- Complete company and contact information here. Note: We can use the same e-mail address for both validation and contact. Thus, one person can handle both domain validation and receiving certificate files.

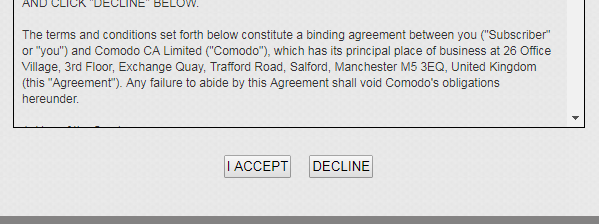
- Click on I ACCEPT to continue.
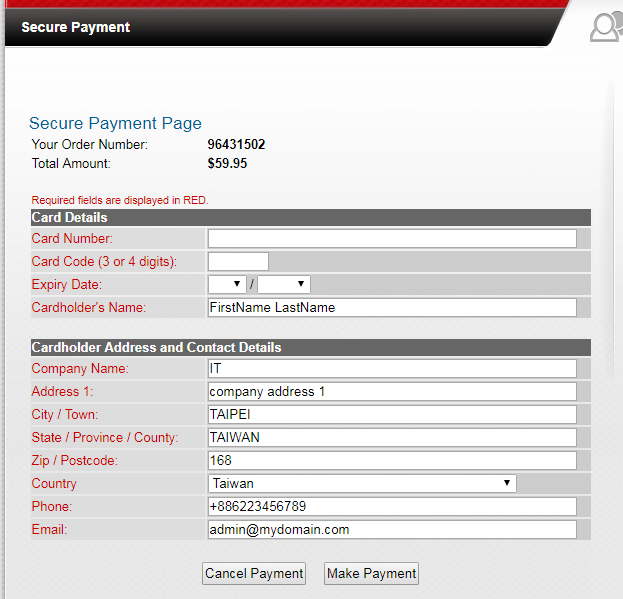
- Make payment with credit card here:
- Once payment is made, [email protected] will receive a Domain Validation e-mail within which there is a validation code.

- Click on hyperlink of here in the e-mail, which will connect to Comodo website to enter the validation code.
- In a few minutes, [email protected] will receive an e-mail attached with a zip file containing signed certificate files.
.
Import CA-signed certificate to EVO Mail Server (using mydomain.com in the demo)
Simply getting certificate signed is not enough. Both CA-signed certificate and certificate chain file need to be imported into EVO Mail Server for SSL/TLS connection to work.
- Extract zip file containing Comodo CA signed certificate files to a temporary folder.
- Open EVO Mail Server GUI.
- Click on Setting tab and scroll down to 6. SSL(TLS) Certificate and Private Key Setting.
- Click on the pull-down list and select matching entry, such as mail.mydomain.com.
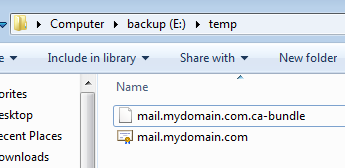
- Click on Import button next to SSL Certificate(X.509) and browse to the temporary folder in step 1. Change file type at lower-right to X.509(*.*), select mail.mydomain.com.crt and click on OK.
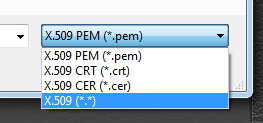
- Click on Import button next to SSL Cert. Chain (X.509) and browse to the temporary folder in step 1. Change file type at lower-right to X.509(*.*), select mail.mydomain.com.ca-bundle and click on OK.
- Once imported, users will not see warning when attempting to send/receive e-mails via SSL/TLS connection.
.
Install EVOServ (ECM & Roundcube Webmail)
ECM enables account owners to modify their account attributes while Roundcube Webmail provide a browser based mail acces in case all other mail clients are not available.
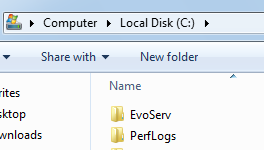
- Download EVOServ from download link provided in Software to download and Install in previous step. Extract it to C:\. Then, there will appear a folder named C:\EVOServ.
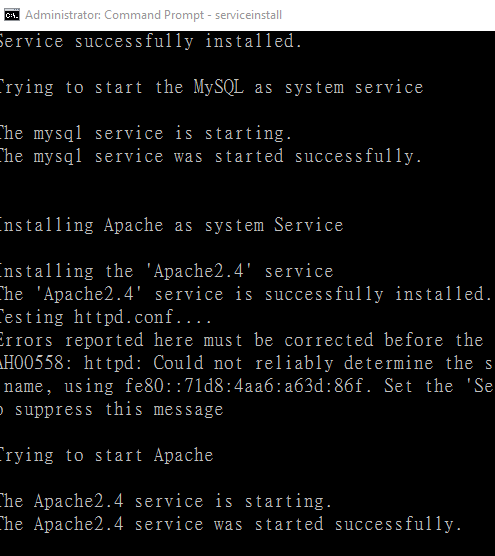
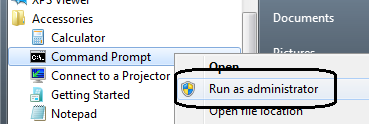
- From Windows’s START menu, find Accessories/Command Prompt. Right-click on it and select Run as administrator. Then, click on YES upon UAC prompt.

- At Command Prompt, type cd c:\evoserv and hit Enter.
- At Command Prompt, type serviceinstall.bat and hit Enter.
- If EVOServ is running successfully, then Command Prompt window will display messages as below:
.
Configure SSL for EVOServ (Roundcube Webmail and ECM)
The CA-signed certificate can also be applied on SSL connection with Roundcube Webmail on a web browser.
- Backup both files of c:\EvoServ\Apache2\conf\httpd.conf & c:\EvoServ\Apache2\conf\extra\httpd-ssl.conf.
- Copy the following certificate files from c:\ProgramData\EvoMailServer\CONFIGS\CERTSTORE\ to c:\EvoServ\Apache2\conf\: mail.mydomain.com.key
mail.mydomain.com.crt
mail.mydomain.com.chn - Download SSL config files.
- Copy httpd.conf extracted from evoserv_httpd_config_files.zip to replace c:\EvoServ\Apache2\conf\httpd.conf. Copy httpd-ssl.conf from evoserv_httpd_config_files.zip to replace c:\EvoServ\Apache2\conf\extra\httpd-ssl.conf.
- Use text editor such as Notepad or Ultraedit to edit c:\EvoServ\Apache2\conf\extra\httpd-ssl.conf. Parameters to be edited are:
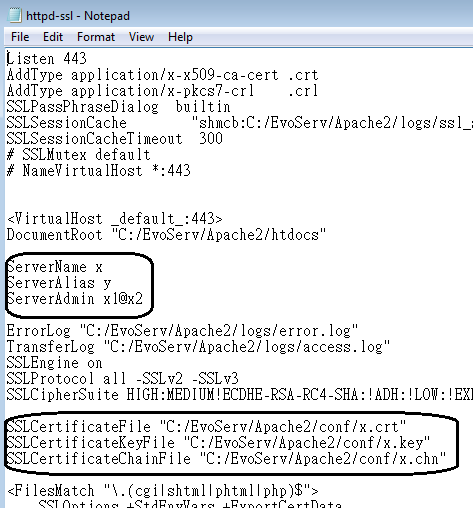
ServerName x, x is computer host name of your MX record,Ex: mail.mydomain.com
ServerAlias y, y is alias of mail server host, Ex: webmail.mydomain.com
ServerAdmin x1@x2, administrator’s e-mail address, Ex: [email protected]
SSLCertificateFile “C:/EvoServ/Apache2/conf/x.crt”, certificate file, Ex: mail.mydomain.com.crt。
SSLCertificateFile “C:/EvoServ/Apache2/conf/x.key”, private key file, Ex: mail.mydomain.com.key
SSLCertificateChainFile “C:/EvoServ/Apache2/conf/x.chn”, certificate chain file, Ex: mail.mydomain.com.chn - Once you finish editing, save it in file format of UTF-8 NO BOM.
- Finally, restart Apache service. Steps are as below:
- From Start menu, find Accessories/Command Prompt. Right-click on it and select Run as administrator. Then, click on YES in UAC.
- At Command Prompt, enter cd c:\evoserv.
- At Command Prompt, enter serviceremove.bat.
- At Command Prompt, enter serviceinstall.bat.
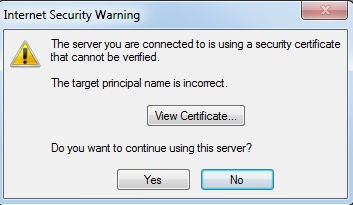
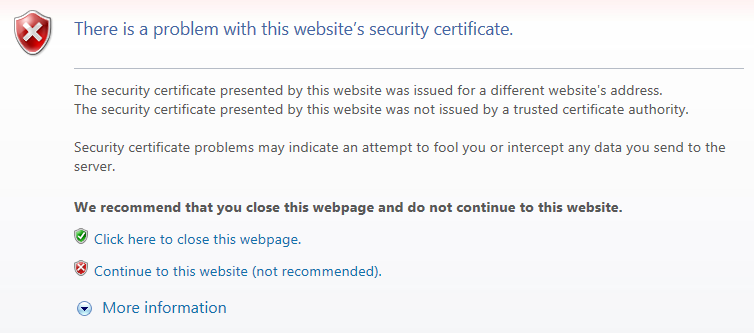
- If SSL implementation is successful, browsing https://mail.mydomain.com will not trigger a warning page as below:
- From Start menu, find Accessories/Command Prompt. Right-click on it and select Run as administrator. Then, click on YES in UAC.
.
Adding local mail accounts
This is a basic method of adding a mail account other than AD/LDAP-sync.
- Before adding any new e-mail account, let us set a default quota value for each individual mailbox. In Windows Explorer, browse to C:\ProgramData\EvoMailServer\CONFIGS\ and edit a file called config.ini with UltraEdit or Notepad.exe. Change two parameters:
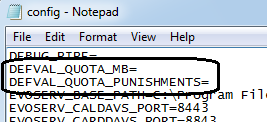 DEFVAL_QUOTA_MB=
(Add an integer following the equal sign. If left blank, then newly created e-mail accounts will not have quota limitation.)
DEFVAL_QUOTA_PUNISHMENTS=
(Add a combination of R, S, and N capitalized letters. They can be in any order with no space in between, such as RSN, RN, RS, N, or SRN.)
R – No incoming and outgoing e-mail allowed.
S – No outgoing e-mail allowed.
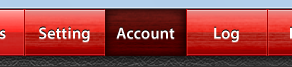
N – System will notify e-mail account owner via e-mail that Quota limit has been reached. - Click on Account tab.
- Click on New button at lower-right to create new an e-mail account.
- Under User Account editor window, enter account’s basic information.
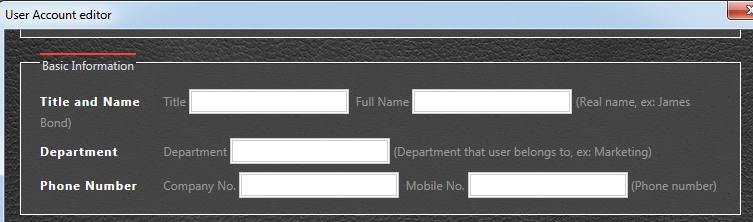
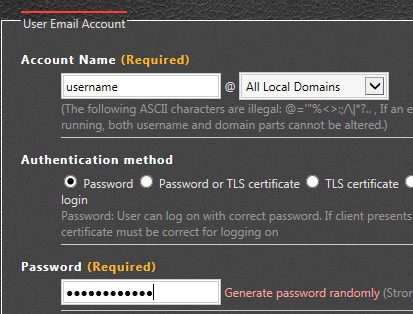
- Then, enter username part and select domain part (If All Local Domains is selected, then [email protected], [email protected] and [email protected] are considered to be the same account sharing the same mailbox.) of new e-mail account as well as filling in password.
- Throughout User Account editor, you can assign rights and privileges accordingly. For example, it is possible to re-define mailbox disk quota for any individual e-mail account. To do so, open any specified account, scroll down to where Quota feature is located. Then, set the quota and action to be taken once Quota limit has been reached.

.
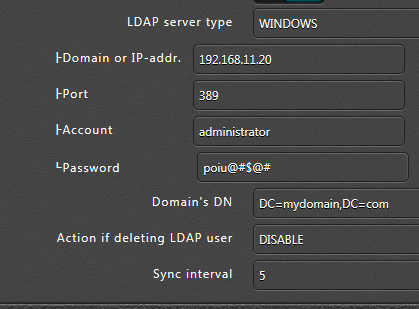
Adding mail accounts via AD or LDAP (using mydomain.com in the demo)
If your network has an Microsoft AD server or Linux LDAP server, then users can log in EVO Mail Server via authenticating with these services.
- Run EVO Mail Server GUI by double-clicking on its icon.
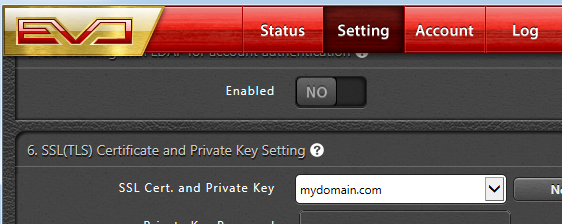
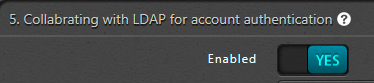
- Click on Setting tab, scroll down to 5. Collabrating with LDAP for account authentication, and click on NO switch and turn it to YES.
- For rest of the parameter settings, please refer to the following example:
 For parameter description in detail, please refer to related topic on Tech Support section of our website.
.
STEP 5: Mail Client Software Settings and Testing
.
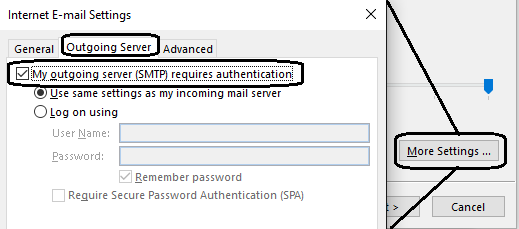
Create e-mail account and test sending/receiving e-mail in Outlook (using domain.com in the demo)
- Enter e-mail account, mail server URI and password.
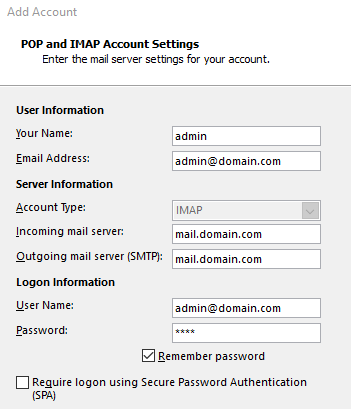
- SMTP Auth must be checked!!!!!
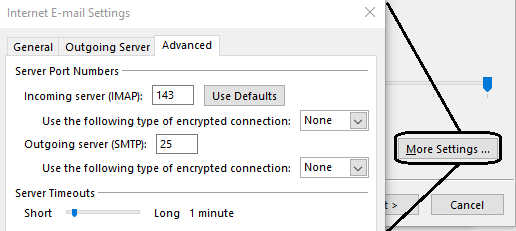
- Non-SSL/TLS connection:
 SSL/TLS connection:
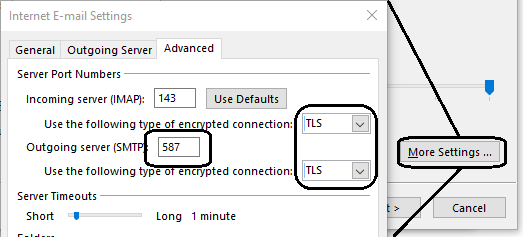
- Click on NEXT to test…
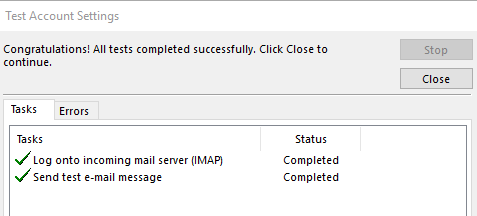
- Now, we can send an e-mail to any external e-mail account such as Gmail. Once we receive the test e-mail in Gmail, we can reply and check if reply e-mail arrives in Outlook.
.
Synchronizing contacts, calendars and tasks in Outlook
EVO Mail Server works with EVO Collaborator for Outlook and Outlook users can synchronize their contacts, calendars and tasks.
- Download EVO Collaborator for Outlook and install it.
- Click on EVO ribbon at top.
- Click on Configure Profile(s).
- Enter mail server URL under Hostname or webcal:// URL, such as mail.mydomain.com.
- Enter username, such as user1 or [email protected], and password.
- Click on TEST button to authenticate.
- Click on Apply to save seettings.
- Click on Quit to leave Configure Profile(s) window and EVO Collaborator for Outlook will start synchronizing.
.
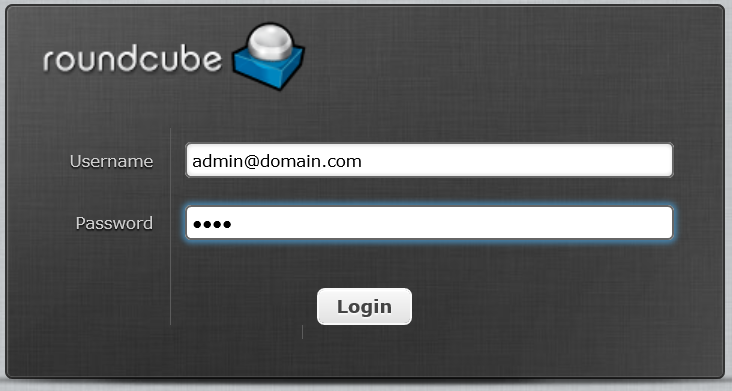
Testing Roundcube Webmail (using domain.com in the demo)
- On your web browser, enter URL such as http://mail.mydomain.com, you will see ECM (EVO Collaborator Mobile) Homepage.
- Click on Roundcube Webmail.

- At logon screen, enter your username (be sure to enter complete e-mail address) & password and hit Login button.
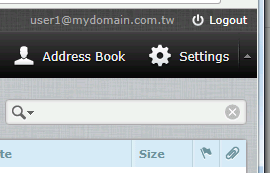
- Now, we can send an e-mail to any external e-mail account such as Gmail. Once we receive the test e-mail in Gmail, we can reply and check if reply e-mail arrives in Roundcube web mail.
- Next, we can configure CardDAV plugin for Roundcube so users can also synchronize contacts with EVO Mail Server.
- Click on Settings at top-right.
- Click on CardDAV in menu at lower-left.
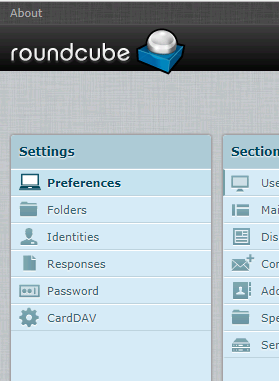
- In password field, enter password and click on Add.
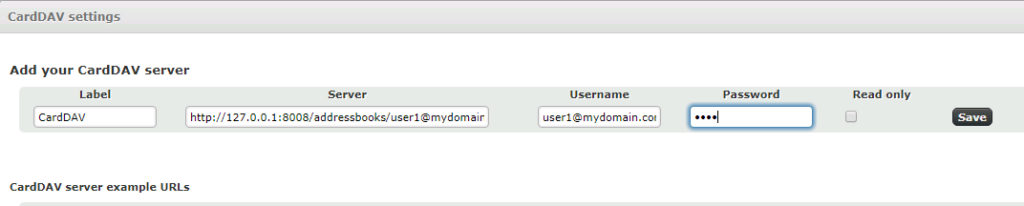
- Once saved, Roundcube will synchronize contacts with EVO Mail Server.
.
Testing EVO Collaborator Mobile (ECM) (using domain.com in the demo)
In EVO Collaborator Mobile, users can modify some property in their account configurations, such as auto-reply note as well as uploading/downloading/sharing files.
- On your web browser, enter URL such as http://mail.domain.com, you will see ECM (EVO Collaborator Mobile) Homepage.
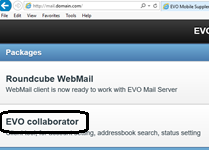
- Click on EVO Collaborator.
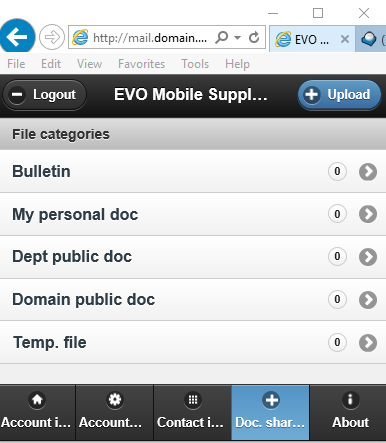
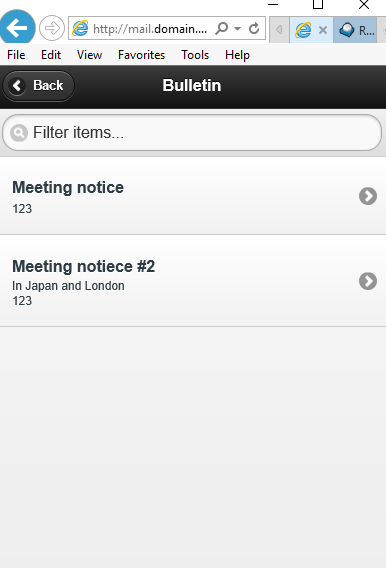
- Once users log in, they can modify some settings in their e-mail account profiles, upload files, browse bulletin boards and etc. Bulletin is inside Doc. Sharing at bottom.
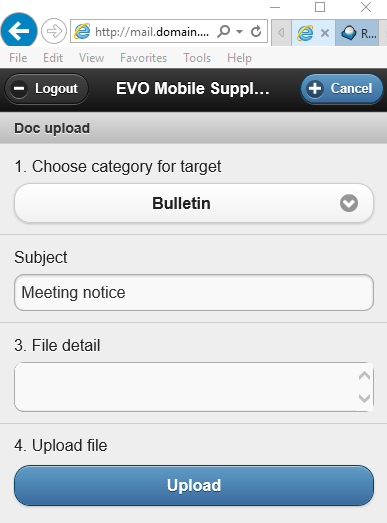
- To post on bulletin board, click on + Upload at top-right. Click on Choose category for target and select Bulletin. Enter Subject and File detail. Then, click on Upload button to post a message, which will also be accessible by other users.
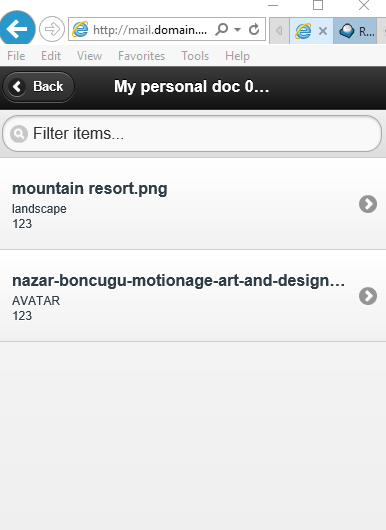
- To upload personal files and enable sharing, click on My personal doc, click on Browse button to select a local file as well as entering file description. Then, click on Upload.

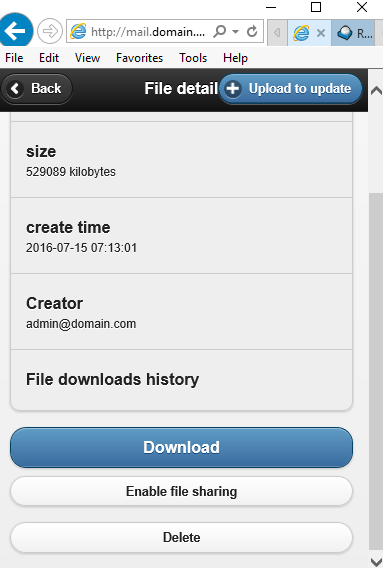
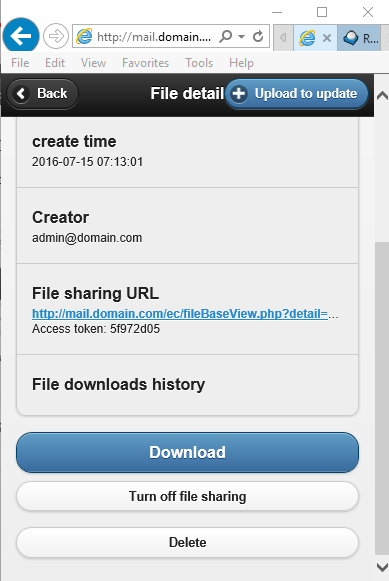
- After uploading is complete, click on a selected file inside My personal doc and configure file sharing. Click on Enable file sharing button. Both Internet URL and password will be displayed under File sharing URL.
To wrap this tutorial, EVO Mail Server is a Windows mail server worth every penny. It provides simple configuring, concise mail log, Spamhaus antispam strategy, NOD32 Antivirus integration, IMAP and Roundcube Webmail as well as groupware features of syncing contact, calendar and task, self-generating server SSL certificate and lastly fast tech support via e-mail. You can give it a try.