
This Configuration Guide takes you step-by-step to fully utilize all features embedded
-
EVO Mail Server software Installation
-
EVO Mail Server settings
.
EVO Mail Server software installation
-
Check list before installation:
- Run through pre-installation steps if necessary.
- Log on Windows as administrator.
- Turn off UAC to skip UAC warning messages if you want. If turned off, then you need to make sure you run the .msi file with right-click on evoms*.msi and select Run as administrator.
- Confirm Internet access is through.
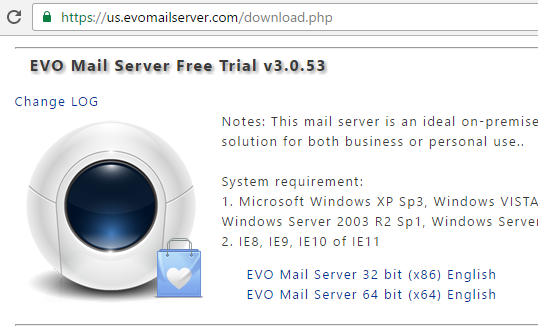
- Download newest EVO Mail Server (evoms*.msi) from EVO’s official website.
” * ” of evoms*.msi refers to bit-version. Make sure you download matching bit-version of your OS.
-
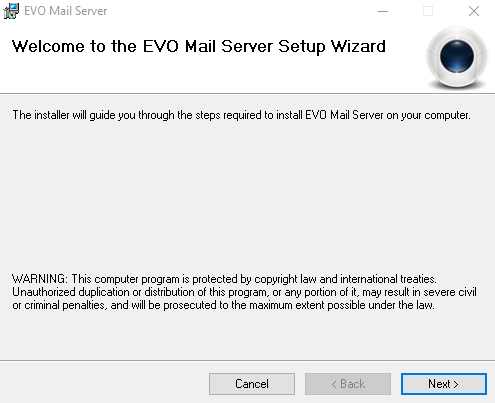
Run the downloaded .msi file and click on Next till the end of installation.
-
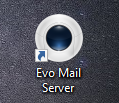
Double-click on EVO Mail Server icon to launch the software.
-
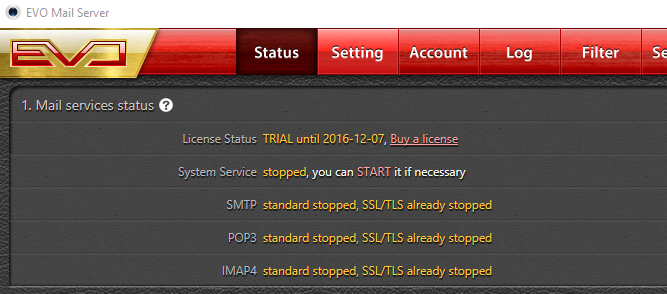
Click on START to initiate services under Status tab.
-
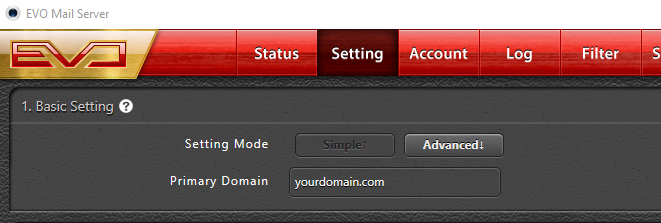
Click on Setting tab and fill in your domain in space next to Primary Domain.
-
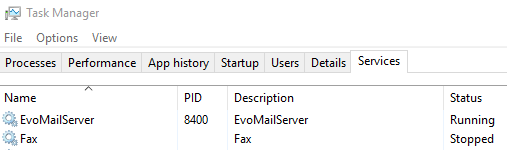
At this point, EVO Mail Server is running as service.
-
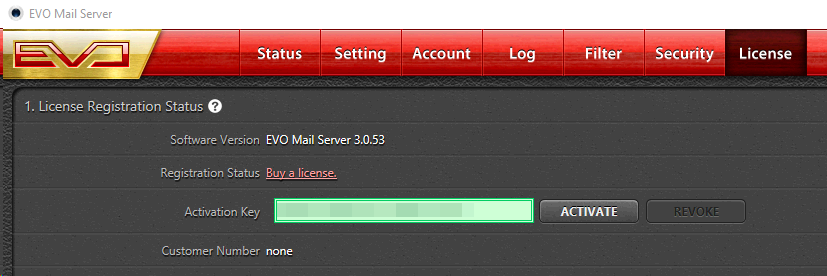
To activate your license key, click on License tab.
.
EVO Mail Server settings
-
-
Status – An overview of mail services, DNS settings, and hardware settings:
- Mail services status -Turning on or off EVO mail service:
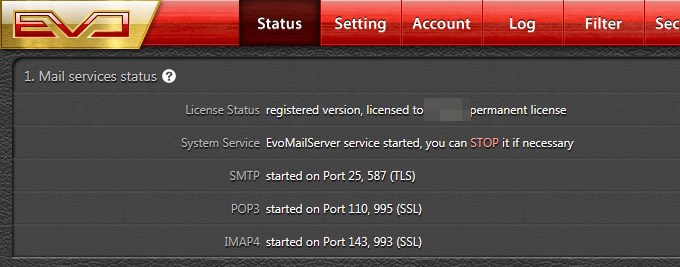
- License status – License activation status: licensee or trial expiration date.
- System service – Click on START to start service or click on STOP to turn off.
- SMTP service – Current SMTP port being used: 25, 587 or 465.
- POP3 service – Current POP3 port being used: 110 or 995.
- IMAP service – Current IMAP port being used: 143 or 993.
- Network setting status – Current network and DNS status of your mail server:
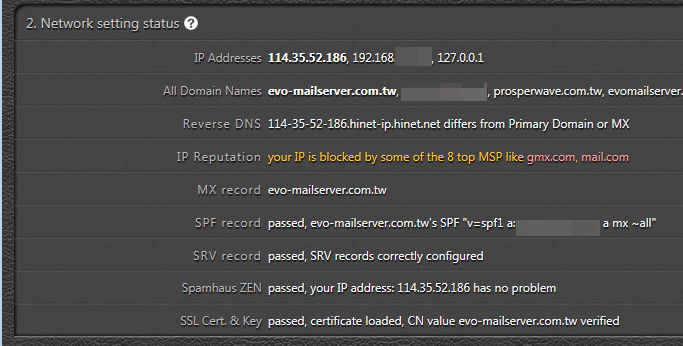
- IP address – All detected IP addresses assigned to EVO Mail Server computer host.
- All domain names – Local host name and all domain names for which EVO is hosting mail services.
- Reverse DNS – Server host name to which your public IP is reversely resolved and it is usually the MX record value.
Note: Like screenshot, major mail service providers, such as gmx.com and 1and1.com, start to reject mails if the reserve resolution value s different than your domain. - IP Reputation – IP reputation check on mail server host’s public IP address.
- MX record – DNS record with computer host name(s) handling mail exchange job for primary domain.
- SPF record – DNS record with authorized mail server(s) handling mail exchange job for primary domain. (What is SPF?)
- SRV record – One or more DNS records enables mail clients to auto-discover mail server’s parameters for auto-configuration. (What is SRV?)
- DKIM record – The DKIM support attaches a dedicated signature signed by your domain’s private key. Recipient mail server will try to pair it up with the DKIM public key given in sender mail server’s DNS hosting service. If they match, then we can assume this e-mail came from a legit mail server belonged to sender’s domain.
- When it is not configured or configured incorrectly, a warning message will appear as below:

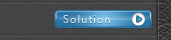
- Now, click on the Solution button to the right. There will pop up a notepad window showing primary domain’s public key that is to be implemented in DKIM record in DNS hosting service.
- Use COPY+PASTE hotkey to copy the full string and transfer it to DKIM TXT record in DNS hosting service. Basically, two parts are required to be pasted: (Zoneedit is used as an example)
- Host: A fixed value of evoms._domainkey. If your service provide’s TXT format requires entering a Selector , thenenter evoms instead.
- Parameter or value: Paste the full string we mentioned previously.
- Once completed, restart EVO Mail Server’s UI. If configured correctly, then DKIM line will appear as below:

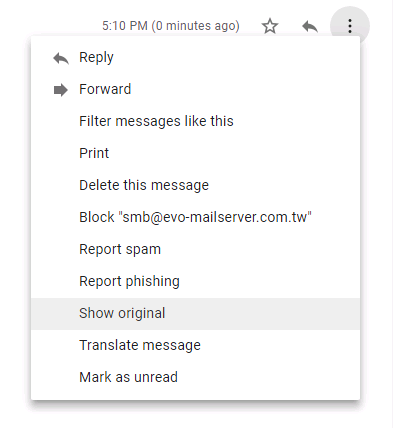
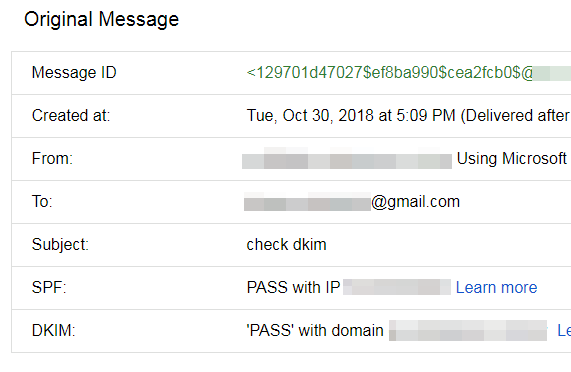
- Check if recippient mail server passes DKIM from sender mail server. Let’s send an e-mail to Gmail. Then, log on Gmail and open the incoming e-mail with DKIM in it. Click on 3-dots button at top-right and select Show original. The DKIM line will show ‘PASS’.
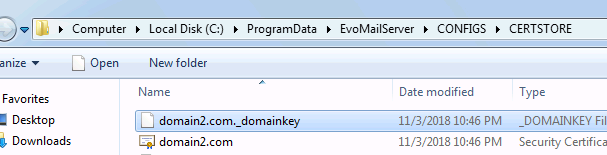
- NOTE 1: If we need to add DKIM to secondary and additional domains, let say it’s domain2, then go to c:\ProgramData\EvoMailServer\CONFIGS\CERTSTORE\ and open domain2._domainkey. Perform COPY+PASTE and proceed step 3 and so on.
 NOTE 2: Recently, DKIM and SPF have increasingly caught attention of Gmail, Yahoo,Outlook.com and other major mail service providers. Once they are implemented,
  DMARC record can also be implemented to reduce the chance of e-mails from your mail server being recognized a spam mail can be smaller.
 NOTE 3: DMARC – Following implementation of SPF and DKIM, DMARC (Domain-based Message Authentication Reporting and Comformance) can be configured. DMARC enables sender mail server to suggest recipient mail serer how to deal with e-mails suspicious of being spam mails. In return, recipient mail server will periodically provide corresponding statistic report to sender mail server.
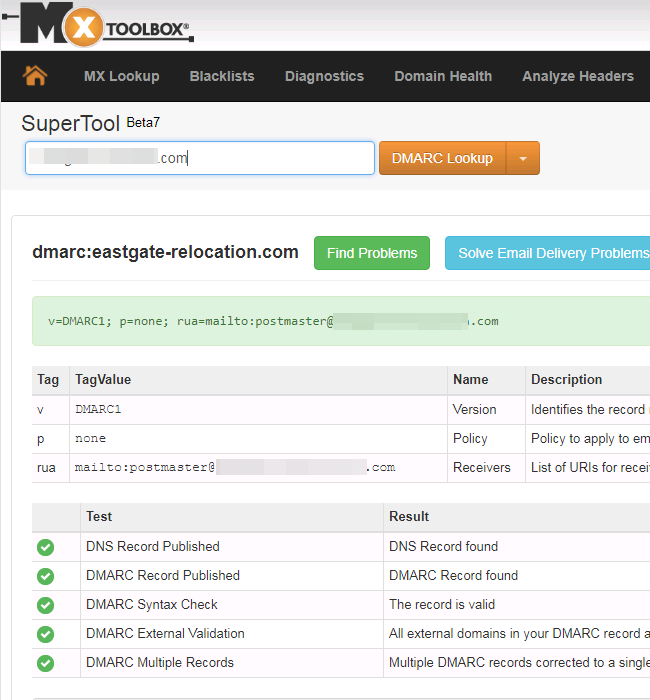
The following steps will guide you on how to configure DKIM feature:- Log on your DNS hosting service.
- Add a TXT record.
- For Host, enter _DMARC.
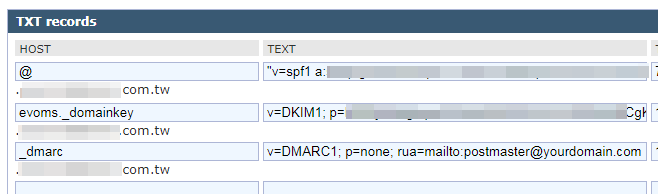
- For parameter, it varies how you like to define the rule and here is an example: “v=DMARC1; p=none; rua=mailto:[email protected]”. Refer to DMARC official website for more detail.
- Save settings and wait for DMARC record to be effective. Then, check the record via MX Toolbox:
- When it is not configured or configured incorrectly, a warning message will appear as below:
- Spamhaus ZEN – Anti-spam service from Spamhaus if mails are sent from spam source.
- SSL Cert. & Key – Checks if current installed SSL certificate matches primary domain’s common name (CN).
- Server setting status – Hardware and software info on mail server:
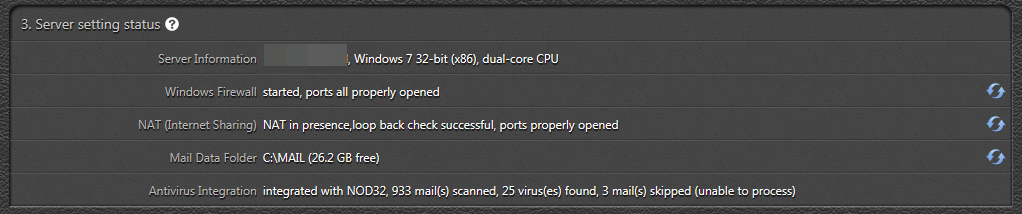
- Server information – Server host name, operating system and CPU type (Recommended hardware spec).
- Windows Firewall – Port opening status on Windows Firewall. Click on the circle arrows to the right to start detecting current Windows Firewall port status. (How to open a port?)
- NAT (Internet Sharing) – Port mapping status on NAT. Click on the circle arrows to the right to start detecting current NAT port status. (Refer to your NAT’s user manual)
- Mail Data Folder – Data storage location for mail data and mail server configuration files. Click on the circle arrows to the right to browse folders and move all mail data to the new location.
- Antivirus Integration – Integrated antivirus software and virus scan reporting. (ESET NOD32 Antivirus)
- Mail services status -Turning on or off EVO mail service:
-
Setting – Configuring domain settings, mail protocols, LDAP authentication, anti-spam and antivirus:
- Basic Setting – Minimum information to enter here for EVO Mail Server to run:
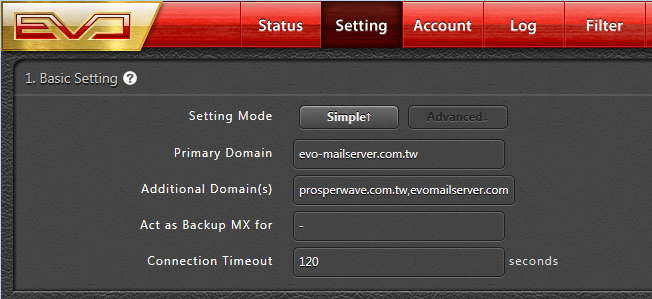
- Setting Mode – Click on Simple or Advanced button to further configure EVO Mail Server.
- Primary Domain – Primary domain that EVO Mail Server is hosting for. EVO Mail Server will check the domain’s DNS configurations as well as certificate’s common name (CN). Check result will reflect on Network section of Status tab. Tip: This checkup also works on your additional domain(s) when you replace primary domain with the additional domain(s) one at a time.
- Additional Domain(s) – Additional domain(s) that EVO Mail Server is hosting for. EVO will check the domains’ DNS configurations as well as certificate’s common name (CN). Regarding IP reverse resolution for additional domain(s), as long as server IP’s reverse resolution value does not contain keywords such as PPPoE, dynamic, dialup, or dial-up, mails delivered from additional domain(s) should not be rejected by recipient mail server due to IP reverse resolution issue.
- Act as Backup MX for – EVO Mail Server is able to play as a contingency backup server to temporarily receive e-mails for domains other than the ones hosted by EVO Mail Server. Once the domain’s primary mail server is back online, EVO Mail Server will relay all mails received during downtime back to the primary mail server. Before doing so, add one A record and one MX record in that domain’s DNS configuration.
- Connection Timeout – An integer value between 120 to 1800 and counting in seconds. When exceeding this defined time frame, if there is not any activity in a session, then EVO Mail Server will disconnect from it.
- SMTP (ESMTP) Setting – Outgoing mail related settings based on SMTP:
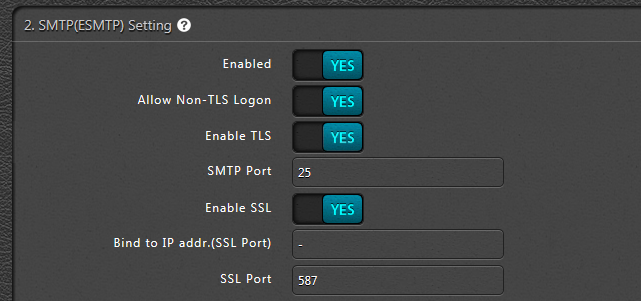
- Enable – Enable or disable SMTP/ESMTP service for both non-SSL and SSL/TLS connections.
- Allow Non-TLS Logon – Enable or disable allowing users to log on via non-TLS connection or not? Enabling it may cause security issue.
- Enable TLS – Enable or disable ESMTP’s STARTTLS connection.
- SMTP Port – Connection port for SMTP with an integer value ranging from 1 to 65535. The default port # is 25 for both non-SSL and STARTTLS.
- Enable SSL – Enable or disable ESMTP’s SSL connection on SSL port of 465 or submission port of 587.
- Bind to IP addr. (SSL Port) – Assign SSL port of 465 or submission port of 587 to a pass-through external mail filter in a dual-NIC environment.
- SSL Port – Connection port with an integer value of 587 for STARTTLS as default or 465 for Implicit SSL.
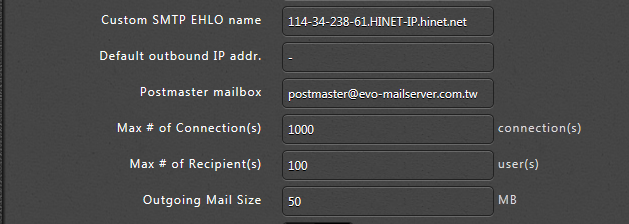
- Custom SMTP EHLO name – By default, the value is blank since the server uses MX record as its SMTP EHLO name or you can define the name under special circumstances.
- Default outbound IP addr. – By default, the value is blank since the server will automatically decide its IP or you can specify an intended valid IP in a multi-IP environment.
- Postmaster Mailbox – A default value of “[email protected]” will be used unless otherwise specified.
- Max # of Connection(s) – Maximum number of simultaneous SMTP connection and the configurable value ranges from 20 to 1000.
- Max # of Recipient(s) – Maximum number of local recipient accounts up to which an e-mail message can be delivered and it ranges from 100 to 1000.
- Outgoing Mail Size – Maximum mail size in MB that SMTP service allows an e-mail message to carry and it ranges from 20 to 4096.
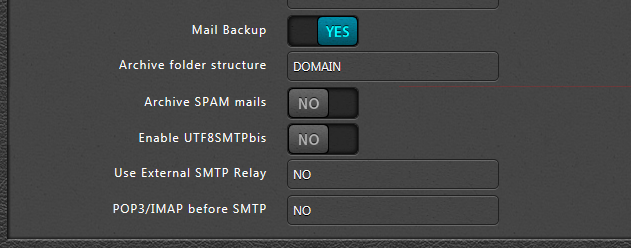
- Mail Backup – Enable or disable to archive all incoming and outgoing e-mail messages (not including returned messages) in folder named ARCHIVE and this folder can be accessed by “Mail archive auditor” or “Mail archive operator”.
- Archive folder structure – Mail archive folder structure can be sorted either by Date or Domain.
- Reminder:
- If by Date, archive operator or auditor can view all domains regardlessly.
- If by Domain, then he is only privileged to view the domain where he belongs to under <EvoMailServer folder>/HOSTS/DEFAULT/ ARCHIVE.
- Or, there is a more restricted setting by narrowing privilege down to the department level where he belongs.
- Please follow the rules below for regulating archive access privileges along with this screenshot:
- Assign Account Type to either Mail Backup Operator or Mail Backup Auditor.
- For domain part after ‘@‘, there are two options:
- a. Assign the domain part in Account Name to All Local Domains to manage or audit mails across all domains. The actual mail data path is: <EvoMailServer folder>/HOSTS/DEFAULT/ARCHIVE
- PS. 1: When assigned to All Local Domains, the IMAP folder structure for archive is: [Default/<account name>/<INBOX or OUTBOX>/Date].
- PS. 2: When assigned to <any domain hosted by EVO>, the IMAP folder structure for archive is: [<domain name>/<account name>/<INBOX or OUTBOX>/Date].
- b. Assign the domain part in Account Name to any other listed domain to manage or audit mails within that particular domain. The actual mail data path is: <EvoMailServer folder>/HOSTS/DEFAULT/ARCHIVE/<domain name>
- PS. 1: When assigned to <any domain hosted by EVO>, the IMAP folder structure for archive is: [<account name>/<INBOX or OUTBOX>/Date].
- a. Assign the domain part in Account Name to All Local Domains to manage or audit mails across all domains. The actual mail data path is: <EvoMailServer folder>/HOSTS/DEFAULT/ARCHIVE
- Theoretically, archive manager or auditor does not belong to any department. Please leave Basic Information / Department blank in their User Account Profile. However, there is an exception for part b. of previous step:
- a. If Basic Information / Department is filled with an existing department, then this archive operator or auditor is ONLY allowed to manage mail archive within that particular department.
- PS. 1: When assigned to <any department with any domain hosted by EVO>, the IMAP folder structure for archive is: [<account name>/<INBOX or OUTBOX>/Date].
- a. If Basic Information / Department is filled with an existing department, then this archive operator or auditor is ONLY allowed to manage mail archive within that particular department.
- Reminder:
- Archive SPAM mails – Enable or disable that e-mail messages are marked as Spam. However, disabling it may cause a situation that some user intentionally marks important mails as spam so to avoid being archived.
- Enable UTF8SMTPbis – Enable or disable UTF8 SMTP (RFC 5336), which is backward compatible with normal SMTP operation.
- Use External SMTP Relay – Enable or disable usage of External SMTP Relay and options are:
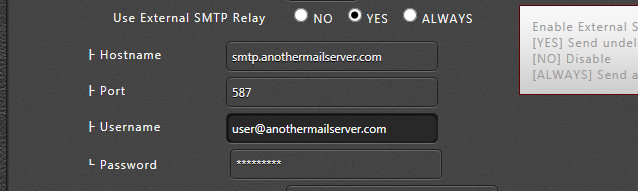
- No – Disable the Relay at all.
- Yes – Relay e-mail messages when EVO Mail Server fails to deliver.
- Always – Skip EVO SMTP delivery at all and deploy External SMTP Relay instead.
- Hostname – Enter an available SMTP server.
- Port – Use 25 or 587 or any other port specified.
- Username – Enter the username.
- Password – Enter the password.
- POP3/IMAP before SMTP – Enable or disable allowing users to skip SMTP Authentication to send e-mail messages once they have previously logged in POP3 or IMAP service from certain IP addresses.
- IMAP Setting – Incoming mail related settings based on IMAP:
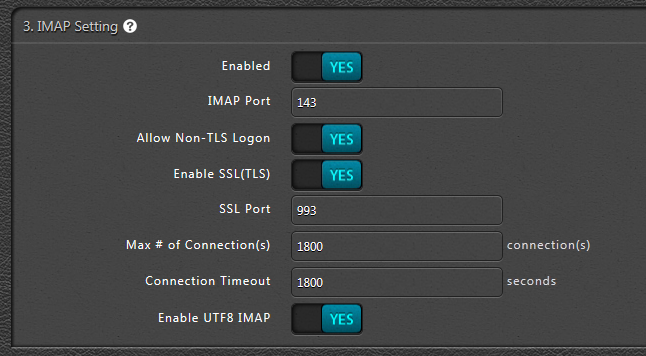
- Enabled – Enable or disable IMAP service of both non-SSL and SSL/TLS connections.
- IMAP Port – Connection port for IMAP with an integer value ranging from 1 to 65535. The default port # is 25 for both non-SSL and STARTTLS.
- Allow Non-TLS Logon – Enable or disable allowing users to log on via non-TLS connection. Enabling it may cause security issue.
- Enable SSL (TLS) – Enable or disable IMAP’s SSL connection.
- SSL Port – Connection port with an integer value of 993 for Implicit SSL.
- Max # of Connection(s) – Maximum number of simultaneous IMAP connection and the configurable value ranges from 20 to 1000.
- Connection Timeout – A configurable timeout period between 1800 and 7200 seconds. Once exceeding this time frame, EVO Mail Server will disconnect the IMAP session.
- Enable UTF8 IMAP – Enable or disable UTF8 SMTP (RFC 5738), which is backward compatible with normal IMAP operation.
- POP3 Setting – Incoming mail related settings based on POP3:
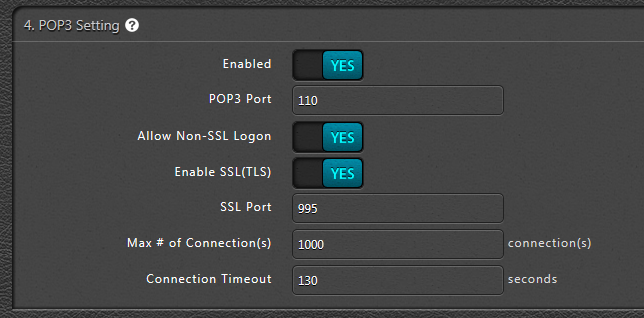
- Enabled – Enable or disable POP3 service of both non-SSL and SSL/TLS connections.
- POP3 Port – Connection port for POP3 with an integer value ranging from 1 to 65535. The default port # is 110 for both non-SSL and STARTTLS.
- Allow Non-SSL Logon – Enable or disable allowing users to log on via non-TLS connection. Enabling it may cause security issue.
- Enable SSL (TLS) – Enable or disable POP3’s SSL connection
- SSL Port – Connection port with an integer value of 995 for Implicit SSL.
- Max # of Connection(s) – Maximum number of simultaneous POP3 connection and the configurable value ranges from 20 to 1000.
- Connection Timeout – A configurable timeout period between 15 and 1800 seconds. Once exceeding this time frame, EVO Mail Server will disconnect the POP3 session.
- Collaborating with LDAP for account authentication – AD or LADP settings for authenticating against AD or LDAP servides:
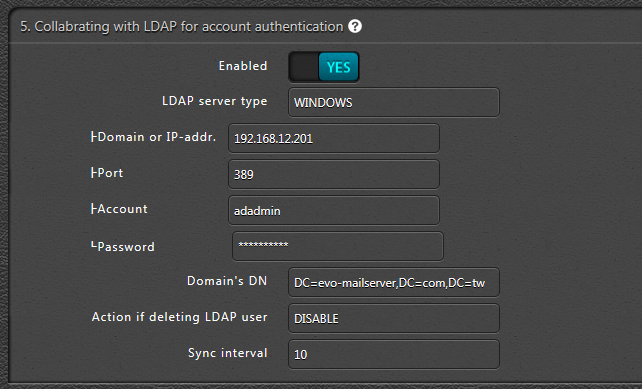
- Enabled – Enable or disable AD/LDAP account and password synchronization:
- LDAP server type – Choose LDAP server type between Windows or Linux.
- Domain or IP addr. – Enter LDAP server’s domain name or IP address.
- Port – Communication port through which EVO Mail Server syncs with LDAP server. The default port is 389.
- Account – Enter the user account with LDAP query privilege.
- Password – Enter password of the above user account.
- Domain’s DN – Enter Distinguished Name (DN) of your domain. Break the whole domain name into several domain components and separate them with comon. Example: ldap.domain.com. Syntax: DC=ldap,DC=domain,DC=com
- Action if deleting LDAP user – Disable or Delete matching local accounts when such accounts are deleted on the LDAP server. The default setting is Disable.
- Sync interval – A configurable time interval in minutes for how often EVO Mail Server checks LDAP user account list and makes necessary synchronization with local accounts.
- Enabled – Enable or disable AD/LDAP account and password synchronization:
- SSL (TLS) Certificate and Private Key Setting – Generating SSL CSR and certificate as well as importing CA-signed certificate, key, bundle chain file:
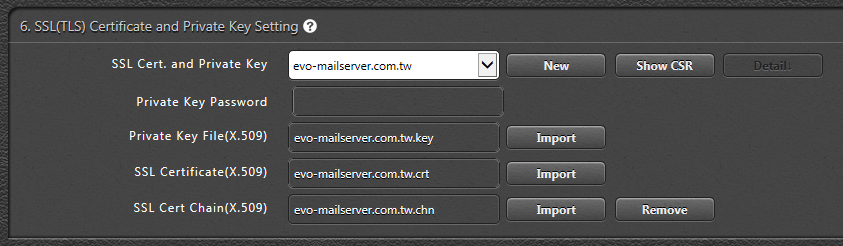
- SSL Cert. and Private Key – This pull-down menu lists certificates of domain(s) hosted by EVO Mail Server:
- New – Pick any domain from the menu and click on New button to create a fresh new certificate the selected domain. The new certificate will replace old certificate previously created.
- Show CSR – Pick any domain from the menu and click on Show CSR to display CSR file content of that selected domain. This CSR is usually used on applying for CA-signed certificate.
- Detail – Pick any domain from the menu and click on Detail button to display certificate properties of certificate’s password, private key, certificate itself and key chain file.
- Private Key Password – Enter a password to secure the certificate matching the selected domain from the menu.
- Private Key File (X.509) – Display private key file matching the selected domain from the menu.
- SSL Certificate (X.509) – Display SSL certificate matching the selected domain from the menu.
- SSL Cert. Chain (X.509) – Display chain file matching the selected domain from the menu.
- SSL Cert. and Private Key – This pull-down menu lists certificates of domain(s) hosted by EVO Mail Server:
- Antispam and Security Setting – Spamhaus ZEN, SPF, password guesser, SMTP EHLO, grey listing settings:
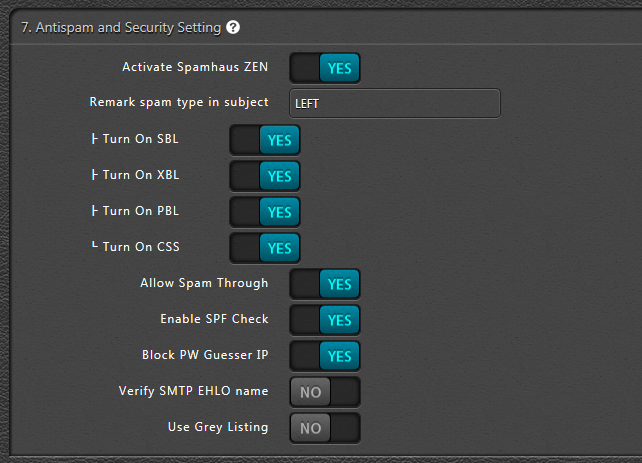
- Activate Spamhaus ZEN – Enable or disable Spamhaus ZEN anti-spam services:
- Remark spam type in subject – Enable or disable remarking spam type on infected e-mail message’s Subject field. Additional option of LEFT and RIGHT enables you place the remark to the left or right of the subject.
- Turn On SBL – Enable or disable Spamhaus SBL that lists spam source IP.
- Turn On XBL – Enable or disable Spamhaus XBL that lists hacked or infected IP that may be used as a spam source.
- Turn On PBL – Enable or disable Spamhaus SBL that lists hosts that fall into ISP’s MTA zone and these hosts usually have dynamic IPs.
- Turn On CSS – Enable or disable Spamhaus CSS that lists hosts used by snowshoe spammers.
- Allow Spam Through – Enable or disable allowing spam mails to go through and they will be remarked as SPAM.
- Enable SPF Check – Enable or disable SPF check to determine if e-mail messages are from an authorized MX server. E-mail messages that fail will be placed in SPAM folders.
- Block PW Gueeser IP – Enable or disable to blacklist password guesser’s IP address and stop them from making further connections. To delist such IP from blacklist, go to Security tab and remove it from IP Origin Filter.
- Verify SMTP EHLO name – Enable or disable to verify against SMTP EHLO CN for SMTP connections. IF EHLO CN’s IP resolution does not match IP address that is making the SMTP delivery attempt, then the e-mail message will be identified as SPAM.
- Use Grey Listing – Enable or disable grey list policy that EVO Mail Server will reject first attempt of mail delivery and accept it in a second attempt of mail delivery within a pre-defined time frame.
- Activate Spamhaus ZEN – Enable or disable Spamhaus ZEN anti-spam services:
- Antivirus Integration Setting – Settings on NOD32 integration with EVO Mail Server:
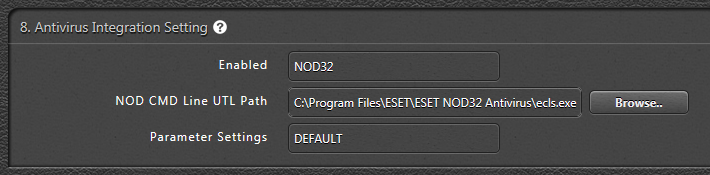
- Enabled – Enable or disable integration of third-party antivirus software application. The default selection is NO while NOD32 and Avast is the options. However, Avast is not recommended at the moment for its current incompatibility of new release.
- NOD CMD Line UTL Path – Once Antivirus Integration is enabled and NOD32 is selected, A default path value will fill in the space. If the cmd executable file is located elsewhere, please locate it by clicking on Browse… button.
- Parameter Settings – Keep the Parameter Settings intact unless you know how to modify parameters and switches after reading NOD32’s user manual.
- EVO Collaboration Add-on CardDAV and CalDAV Setting – Configuring CardDAV and CalDAV add-on with EVO Mail Server:
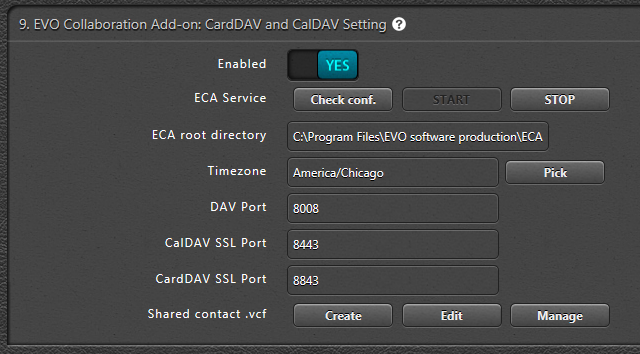
- Enabled – Enable or disable EVO Collaorator Add-on (ECA) service based on integration of Apache/PHP/SabreDAV.
- ECA Service – There are 3 function buttons to manage check, start and stop of ECA services:
- Check conf. – Click to check ECA configuration.
- START – Click to start ECA service.
- STOP – Click to stop ECA service.
- ECA root directory – This root directory is pointing to an ECA installation path.
- Timezone – Timezone for CardDAV and CalDAV deployment purposes. Click on Pick to select matching geological location from the list.
- DAV Port – Common non-SSL port that is shared by CardDAV and CalDAV. The default port # is 8008.
- CalDAV SSL Port – SSL port that is used for CalDAV service. The default port # is 8443.
- CardDAV SSL Port – SSL port that is used for CardDAV service. The default port # is 8843.
- Shared contact .vcf – There are 3 function buttons to manage create, edit and manage of shared address book files (.vcf):
- Create – Click to create new contacts.
- Edit – Click to browse vcf files and make modification.
- Manage – Click to browse to location where .vcf files are stored.
- Self monitoring scheme – Settings on enable or disable port monitoring every certain period of time:
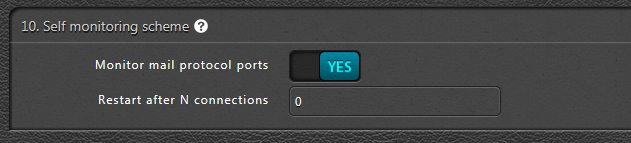
- Monitoring mail protocol ports – Should the service is acting abnormally, EVO Mail Server will automatically restart to avoid crash or malfunctioning. Click the switch between YES and NO to enable or disable real-time monitoring on EVO mail service.
- Restart after N connections – Should the number of any mail service connections reach a threshold limit, EVO Mail Server will automatically restart to avoid crash or malfunctioning. Enter an integer to set an upper limit or enter 0 to disable the monitoring.
- Basic Setting – Minimum information to enter here for EVO Mail Server to run:
-
Account – Add, edit, and delete user accounts as well as account property:
- User Account Manager – List, sort, search, create, group user accounts:
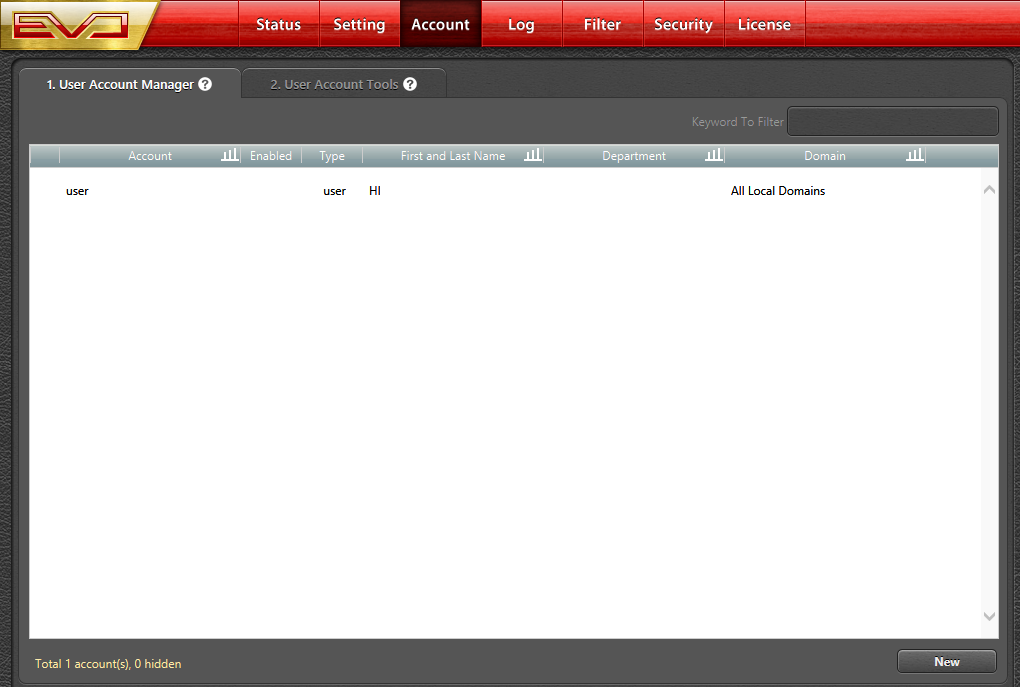
- Account listing in real-time – Adding accounts through Account Password Capturing Mode or deleting user account folder from Windows Explorer will reflect account addition or deletion on e-mail account listing.
- Keyword filter – Enter keyword(s) to match Title, Full Name and Department fields and this will filter out e-mail accounts that do not match.
- Sorting Toggle – Click on headers of Account, First and Last Name, Department or Domain to list all entries in A to Z or Z to A order:

- Account – Name of e-mail account.
- Enabled – Validity of e-mail account indicating whether account is active or inactive.
- Type – Indicating whether account is a user accounts, a group accounts, an AD user accounts or an AD group accounts.
- First and Last Name – Identity of a user account, ie. first name and last name.
- Department – Name of department to which an e-mail account belongs.
- Domain – Name of domain to which an e-mail account belongs. If it is All local Domains, then this e-mail account belongs to all available domains.
- Account editing – Click on any account to open an account profile editor.
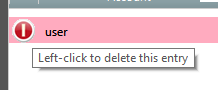
- Account deletion – Click on space to the left of any selected account and a red circle appears for you to confirm account deletion.
- Account addition – Click on New at lower-right of e-mail account listing to open a new account profile editor.

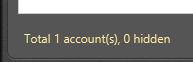
- Account count status – Notice the lower-left of e-mail account listing. A total number of accounts and a number of hidden accounts due to keyword filter are displayed.
- User Account Editor – Parameters and options of an individual mail account:
- Statistical information and usage – Summary of an individual mail box:

- Total mail occupancy – Total disk space this e-mail box occupies.
- SMTP last accessed from and time – Last IP, date and time e-mail account accessed SMTP from.
- POP3 last accessed from and time – Last IP, date and time e-mail account accessed POP3 from.
- IMAP last accessed from and time – Last IP, date and time e-mail account accessed IMAP from.
- Date of previous password reset – Last date and time e-mail account had its password was reset.
- Basic information – General information about account owner:

- Title – Account owner’s title.
- Full Name – Account owner’s full name.
- Department – Department to which the account owner belongs (Note: Department is more than just a name. It can serve as condition in Filtrolysis filtering or group mail backup operator/auditor with granting proper privilege to view/retrieve mail archive).
- Office phone – Account owner’s office phone number.
- Mobile phone – Account owner’s mobile phone number.
- User email account – User account information and credentials:
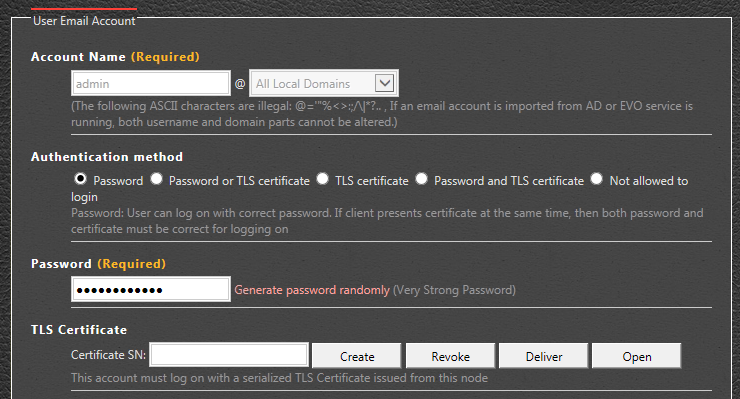
- Account name – Alphbets and numbers, no @='”%<>:;/\|*?..
- Authentication method – Five methods shown as below:
- Password – If user provides TLS certificate also, then the certificate must be correct in order to log on.
- Password OR TLS certificate – If user provides TLS certificate also, then the certificate must be correct in order to log on.
- TLS certificate only – If user provides password also, the password must be correct in order to log on.
- Password AND TLS certificate – It requires users to provide both password and certificate correctly to log on.
- Logon disabled – This option is usually used on group account.
- Password – Create a robust password for account. It is strongly recommended to use the password generator next to password field.
- TLS Certificate – Deploy a certificate to achieve secure logon:
- Certificate SN – The certificate serial number is self-generated and it is unique.
- Create – Click to create a PKCS#12 certificate and private key associated to the mail account.
- Revoke – Click torevoke and delete the deployed certificate for the mail account.
- Deploy – Click to deliver this PKCS#12 certificate and its private key to the mail account’s mailbox.
- Open – Click to open this PKCS#12 certificate and its private key for import or export purpose. Password is
the mail account’s password.
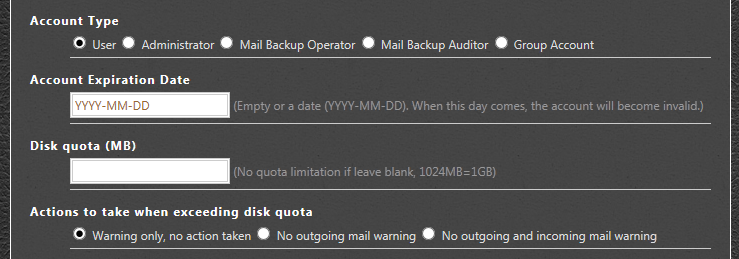
- Account type – Mail account can be assigned to one of the following account type:
- User – Given privilege to send and receive e-mail messages.
- Administrator – Same privileges as User account type plus management rights for future administrator delegation purpose.
- Mail Backup Operator – Log on through IMAP mode to both retrieve all mails and modify flag changes.
- Mail Backup Auditor – Log on through IMAP mode to retrieve all mails with read permission only.
- Group Account – Group up user accounts to receive incoming e-mail messages. The account type does not have SMTP, POP3, and IMAP privileges.
- Account Expiration Date – A date after which the mail account will be disabled. Typically, mail account never expires by default. Date format is expressed in YYYY-MM-DD.
- Disk quota (MB) – Each user account can be assigned with disk quota. If leave it blank, then there is no quota limitation. Note: 1024MB=1GB.
- Actions to take when exceeding disk quota – Explicit actions to be taken when an e-mail account is about to exceed its won disk quota. You can perform one of the following actions:
- Warning only, no action taken – This action is still tolerating users to carry on their intends of sending/receiving e-mails.
- No outgoing mail warning – This action will remind users a little. However, there are still users only care about receiving e-mail messages and keep on ignoring clean up unwanted mails.
- No outgoing and incoming mail warning – The final resolution is deny user’s access to both send and receive e-mail messages. This penalty will affect users’ daily operations the most and it is the most effective way to stop users from abusing its disk quota.
- Account type – Mail account can be assigned to one of the following account type:
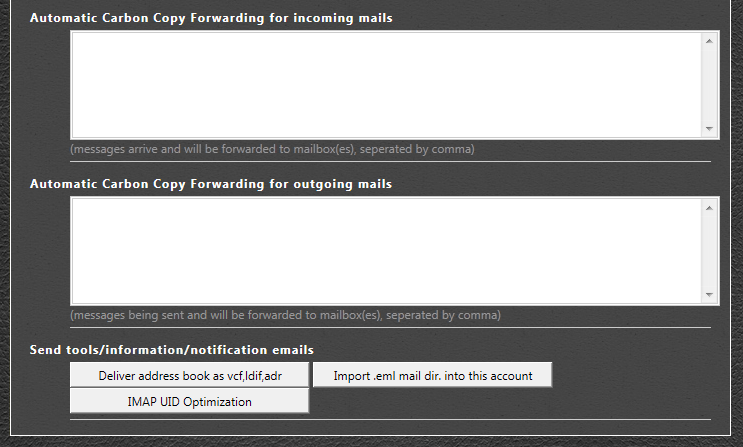
- Automatic Carbon Copy Forwarding for incoming mails – E-mail messages will be forwarded to other e-mail address(es) upon arrival automatically. If forwarding to multiple mail boxes, then use a comma to separate each of them.
- Automatic Carbon Copy Forwarding for outgoing mails – E-mail messages will be forwarded to other e-mail address(es) upon outgoing delivery automatically. If forwarding to multiple mail boxes, then use a comma to separate each of them.
- Send tools/information/notification emails – There are 3 utilities to facilitate server e-mail operations as well as e-mail account’s vcard information distribution on a per-user basis rather than as a whole:
- Deliuver address book as .vcf,.ldif,.adr – Click this button to distribute this mail account’s e-mail address across all user accounts in its domain. Here is an example.
- Import .eml mail dir. into this account – Manually and selectively browse to an .eml source toimport .eml files into this user account. It is useful during partial mail migration.
- IMAP UID Optimization – When performance degrades, you can click on this button to optimize IMAP UID and it will speed up mail retrieval for this particular user account.
- User Right Limitation – There are rights and privileges to be given to or taken away from users:
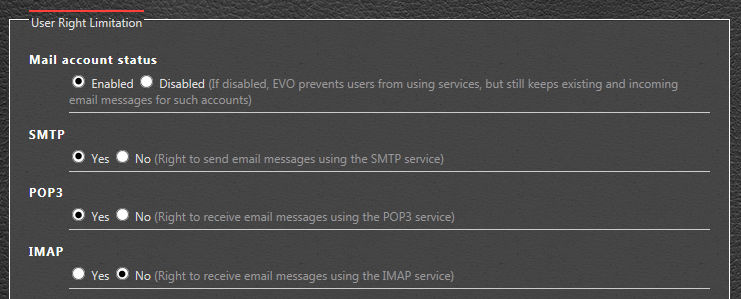
- Mail account status – Enable or disable this user account. However, this account still exists while keeping all its e-mail messages.
- SMTP – Enable or disable the user to send e-mail messages via SMTP service.
- POP3 – Enable or disable the user to receive e-mail messages via POP3 service. When disable, mails will not be stored in POP3 folder to save disk space.
- IMAP – Enable or disable the user to receive e-mail messages via IMAP service. When disable, mails will not be stored in IMAP folder to save disk space.
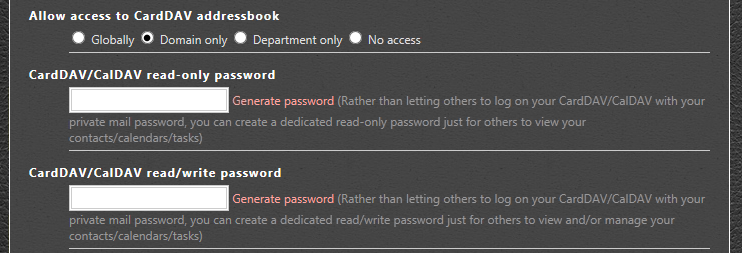
- Allow access to CardDAV addressbook – User account is given access to CardDAV address book based on the following security levels:
- Globally – User account can access all contacts across domains.
- Domain only – User account can access all contacts under the domain it belongs to.
- Department only – User account can access all contacts under the department it belongs to.
- No access – User account is not given access to any contact whatsoever.
- CardDAV/CalDAV read-only password – The mail account owner may distribute this read-only password to affiliates or colleagues to access their address book and calendar for viewing purposes.
- CardDAV/CalDAV read/write password – The mail account owner can use a separate password from its primary e-mail-accessing password for security reason.
- Allow access to CardDAV addressbook – User account is given access to CardDAV address book based on the following security levels:
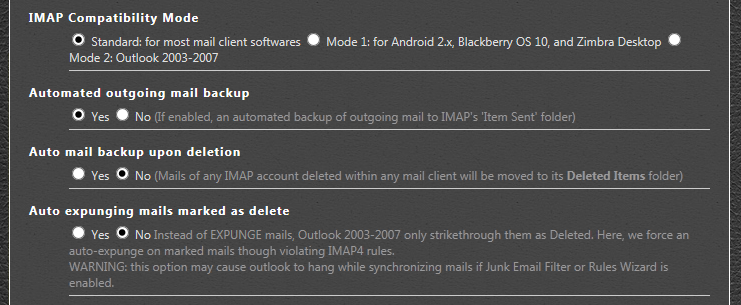
- IMAP Compatibility Mode – This option is for users to adjust EVO Mail Server’s IMAP behaviors to fit into the following client software environment:
- Standard for most mail client software – Most compatible and commonly used for mail client software on the market such as Outlook 2010-2016, Thunderbird, later version of Android, iOS and etc.
- Mode 1: for Android 2.x, Blackberry OS 10, and Zimbra Desktop – Some compatibility issues happen in these 3 mail client environments and EVO Mail Server will adjust itself to fit in during IMAP communication.
- Mode 2: Outlook 2003-2007 – Outlook 2003-2007 sometimes act slightly different when managing IMAP commands.
- Automated outgoing mail backup – Enable or disable to automatically save a copy of sent items in EVO Mail Server’s built-in IMAP folder called Item Sent.
- Auto mail backup upon deletion – Once a delete command is issued by any mail client software, EVO Mail Server will move deleted e-mail messages to a built-in IMAP folder called Deleted Items.
- Auto expunging mails marked as delete – Instead of EXPUNGE mails, Outlook 2003-2007 only strike-through them as Deleted. Here, we force an auto-expunge on marked mails though violating IMAP4 rules. WARNING: This option may cause outlook to hang while synchronizing mails if Junk Email Filter or Rules Wizard is enabled.
- IMAP Compatibility Mode – This option is for users to adjust EVO Mail Server’s IMAP behaviors to fit into the following client software environment:
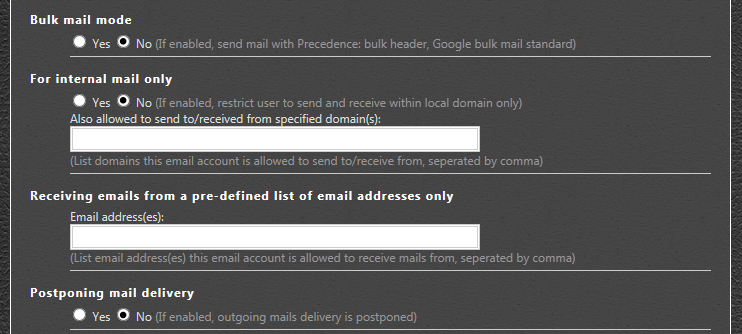
- Bulk mail mode – Enable or disable to add Precedence:bulk header to fulfill Google’s bulk mail policy.
- For internal mail only – Enable or disable to restrict users to send/receive e-mail messages within domains managed by EVO Mail Server internally.
- Receiving emails from a predefined list of email addresses only – List e-mail address(es) that this user account is only allowed to receive mails from. If there are multiple e-mail addresses, then use a comma to separate each of them.
- Postponing mail delivery – Enable or disable to delay mail delivery to e-mail address(es) beyond EVO Mail Server’s hosted domains.
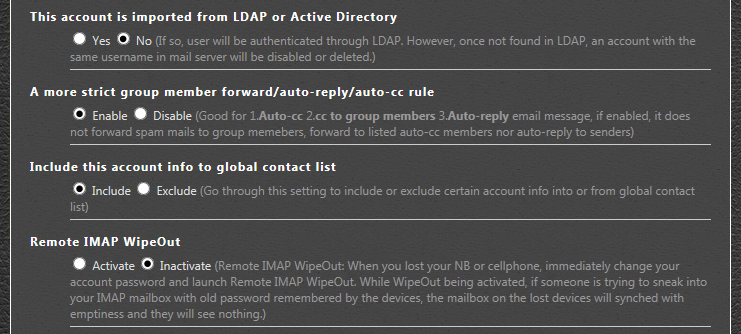
- This account is imported from LDAP or Active Directory? – If Yes, this user account must be authenticated through LDAP. When this account is deleted from LDAP, then it will be disabled or deleted.
- A more strict rule for member group forward auto-reply/auto-forward – Enable or disable to NOT forward spam mails to group of members, listed auto-cc members and auto-reply recipients. It is for the good of not disturbing others with spam mails.
- Include this account into global contact list – Click on Include or Exclude to join or keep off global contact list. Sometimes, certain account should not join the list on purpose.
- Remote IMAP wipeout – Activate or Inactivate to turn on or off Remote IMAP WipeOut. When a mobile device is lost, immediately change account password and enable this feature. If other people access IMAP mails with old saved password in cache, they will see nothing. However, this mail account’s mails still exist on EVO Mail Server. The account owner can access email messages with new password.
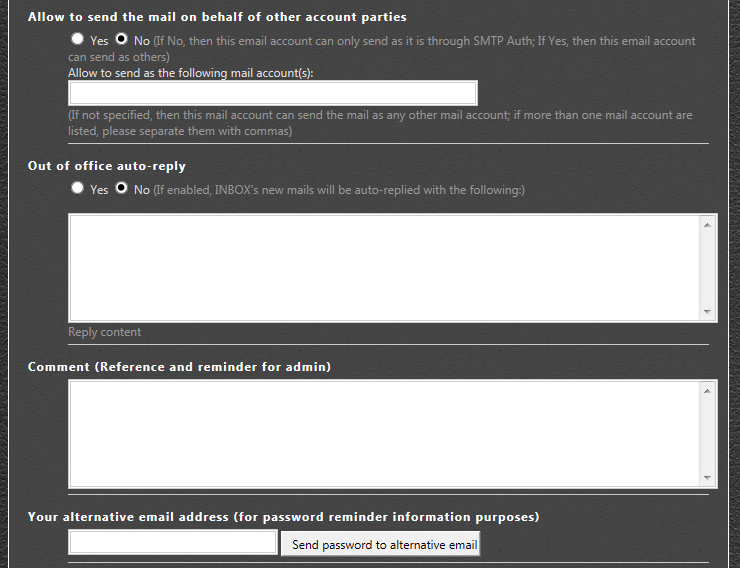
- Allow to send the mail on behalf other account parties – Click on Yes or No to allow or disallow users to send e-mail messages as others. If No is selected, this e-mail account can only send as who it is through SMTP Authentication. If Yes, this e-mail account can send as what e-mail accounts as specified below. If not specified, then this e-mail account can send as anyone.
- Out of office auto-reply – Enable or disable to auto-reply new incoming e-mail messages with the following pre-written Out of Office message.
- Comment – Memo or notes written by administrator about this mail account.
- Your alternative email address – Enter e-mail account owner’s alternative e-mail address. Should the owner forget its password, click on Send password notice to alternative mailbox to remind the e-mail account owner.
- Statistical information and usage – Summary of an individual mail box:
- User Account Tools – There are four tools for administrator to facilitate mass account creations and account/password backup:
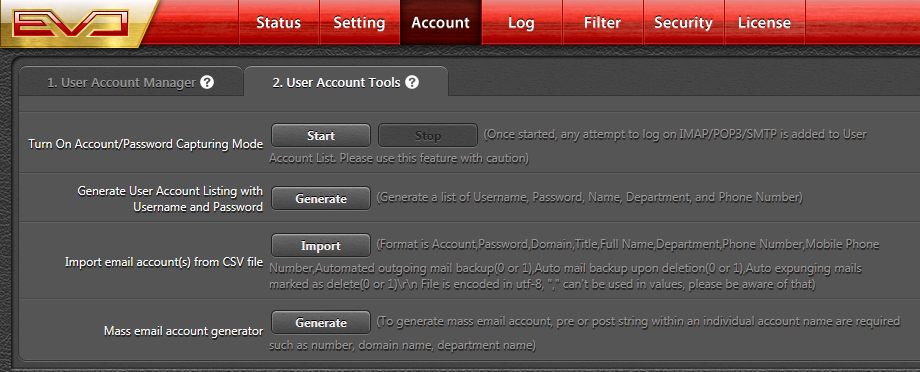
- Turn On Account/Password Capturing Mode – Click Start for 5 to 10 minutes during which any login will be captured and there will generate e-mail accounts by the login names. When finished, click on Stop to terminate capturing process. Most e-mail client software will negotiate to work. However, there are occasions that users cannot log in due to password authentication other than Plain Text is used. Then, tell them to turn off Encrypted Password and use Plain Text instead. Otherwise, Capturing Mode is not able to pick up the entered password.
- Generate User Account Listing with Username and Password – Click on Generate to generate a text file containing all mail account along with other fields in user account profiles. It is an option to includeo r exclude the passwords. This listing file is named as users_report.txt and is located under [Mail Data Folder]\HOSTS\DEFAULT\USERS\TEMP\.
- Import email account(s) from CSV file – Click Import to import a CSV file that contains e-mail account information for mass account import. Be sure not to include any comma (,) within any field and the CSV file must be saved in UTF-8 format. Fields and parameters should go as the following order: account_name, password, domain, username, department, office_phone_number, mobile_phone_number.
- Mass email account generator – Click on Generate to produce bulk mail account at once by keying in prefix, starting number, ending number, domain, department.
- User Account Manager – List, sort, search, create, group user accounts:
-
Log -Mail server performance on incoming, outgoing, spam, undeliverable mails as well as SMTP, IMAP, POP connections:
- Mail Server Real-Time Statistics – EVO Mail Server provides numbers of several useful parameters in real-time:
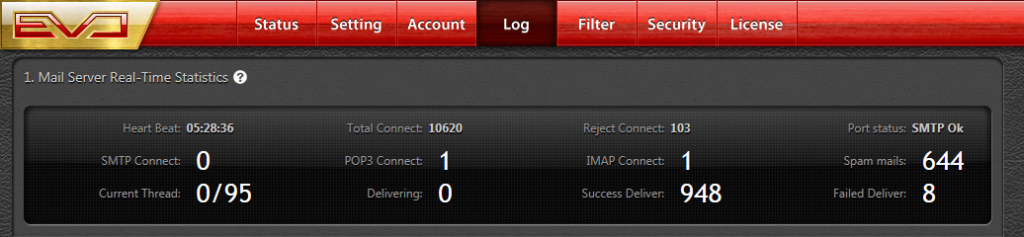
- Heart Beat – Server Keep-Alive Indicator displaying time duration sine last mail server launch.
- Total Connect – Real-time counter on overall connections.
- Reject Connect – Real-time counter for rejected inbound connections.
- Port status – EVO constantly checks on all mail-related ports and return their status.
- SMTP Connect – Real-time counter on SMTP connections:
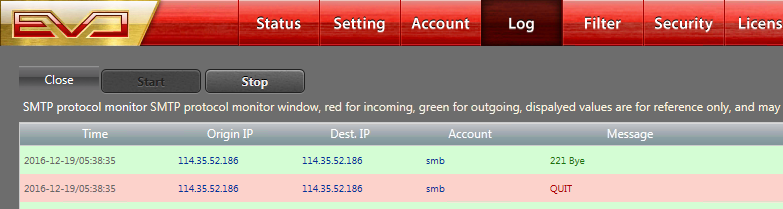
- Close – Click on Close button to close the popup window.
- Start – Click on Start button to resume logging.
- Stop – Click on Stop button to stop logging (Logging will resume upon clicking on Close button).
- Time – Displaying date and time that SMTP command takes place.
- Origin IP – IP address where SMTP command originates.
- Dest. IP – IP address where SMTP command goes to.
- Account – E-mail account that initiates SMTP command.
- Message – Content of SMTP command.
- POP3 Connect – Real-time counter on POP3 connections. It has the same stats table as SMTP Connect:
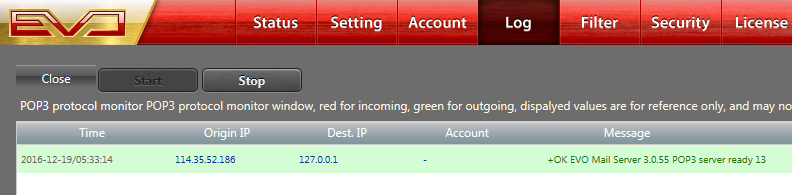
- Close – Click on Close button to close the popup window.
- Start – Click on Start button to resume logging.
- Stop – Click on Stop button to stop logging (Logging will resume upon clicking on Close button).
- Time – Displaying date and time that POP3 command takes place.
- Origin IP – IP address where POP3 command originates.
- Dest. IP – IP address where POP3 command goes to.
- Account – E-mail account that initiates POP3 command.
- Message – Content of POP3 command.
- IMAP Connect – Real-time counter on IMAP connections. It has the same stats table as SMTP Connect:
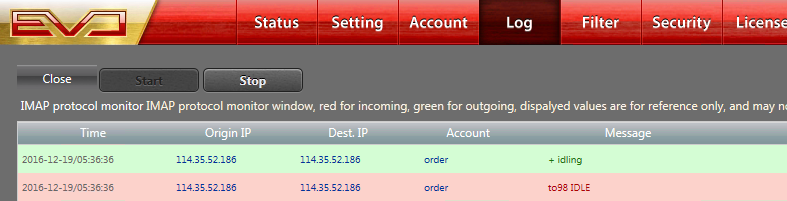
- Close – Click on Close button to close the popup window.
- Start – Click on Start button to resume logging.
- Stop – Click on Stop button to stop logging (Logging will resume upon clicking on Close button).
- Time – Displaying date and time that IMAP command takes place.
- Origin IP – IP address where IMAP command originates.
- Dest. IP – IP address where IMAP command goes to.
- Account – E-mail account that initiates IMAP command.
- Message – Content of IMAP command.
- Spam mails – Real-time counter on busted inbound spam mail messages:
- Close – Close the popup window.
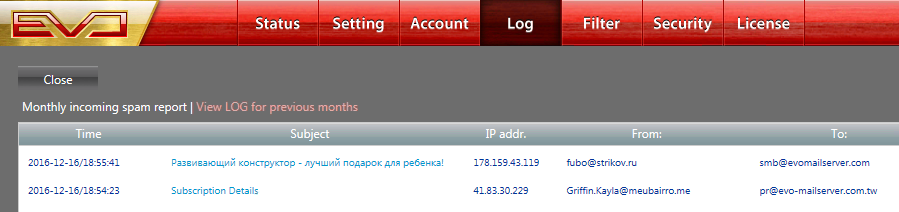
- Monthly incoming spam report – Click on this tab to view spam report of the current month.
- View LOG for previous months – Click on this tab to view spam report from previous months for future reference.
- Time – Displaying date and time that spam mail takes place.
- Subject – Displaying subject of spam mail.
- IP addr. – Displaying IP address from which spam mail was sent.
- From – Displaying sender’s e-mail address.
- To – Displaying recipient’s e-mail address.
- Current Thread – Real-time counter on SMTP outbound delivery threads, total of 95 threads:
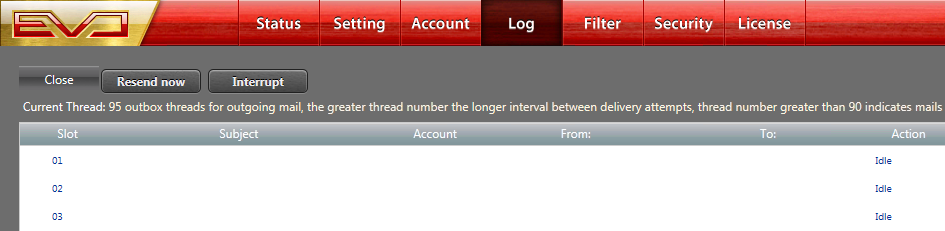
- Close – Close the popup window.
- Resend now – Click Resend now to force a manual resend all threads in the queue.
- Interrupt – Click Interrupt to stop all threads in the queue.
- Slot – There are 95 slots in the queue. Slot #90 to 95 are used to store deliverable messages, which will be resent at a later time.
- Subject – Displaying subject of messages on the queue.
- Account – Displaying senders of messages.
- From – Displaying sender’s e-mail address.
- To – Displaying recipient’s e-mail address.
- Action – Displaying actions being taken at the moment.
- Delivering – Real-time counter on all individual outbound mail messages:

- Close – Close the popup window.
- Unsent email messages – Displaying all unsent e-mail messages.
- Delete all unsent email messages – Click this button to delete all unsent e-mail messages. Sometimes, it is useful in case some abnormal e-mail message stuck in the middle.
- Delete unsent email messages from certain user account – Click this button to delete unsent e-mail messages from certain user account. Sometimes, it is useful in situation where some user likes to recall e-mail messages for some reason.
- Export unsent message list in CSV format – Click this tab to save currently unsent messages into a CSV file for future reference.
- Slot – Thread of e-mail messages being delivered at the moment.
- Subject – Displaying subject of deliverying e-mail messages.
- Account – Displaying sender’s e-mail address.
- From – Displaying sender’s e-mail address.
- To – Displaying recipient’s e-mail address.
- Fail cause – Once delivery taken place, if failed, then some of cause will be displayed.
- Success Deliver – Real-time counter on successful mail deliveries:
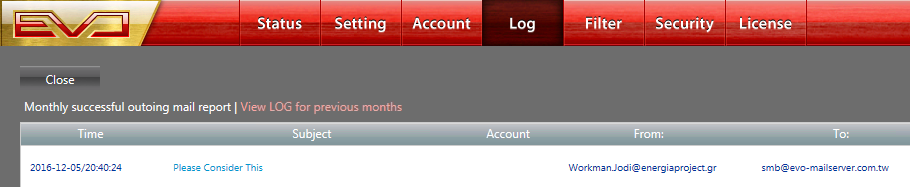
- Close – Click to close the popup window.
- Monthly successful outgoing mail report – Click on this tab to view successful delivery of the current month.
- View LOG for previous months – Click on this tab to view successful delivery from previous months for future reference.
- Time – Displaying date and time that successful delivery takes place.
- Subject – Displaying subject of success delivery e-mail messages.
- Account – Displaying sender’s e-mail address.
- From – Displaying sender’s e-mail address.
- To – Displaying recipient’s e-mail address.
- Failed Deliver – Real-time counter on failed mail delivery attempts:

- Close – Close the popup window.
- Failed mail report of the month – Click on this tab to view failed delivery of the current month.
- View LOG for previous months – Click on this tab to view failed delivery from previous months for future reference.
- Outgoing – Click on this tab to display all outgoing failed delivery.
- Export outgoing report CSV – Click this tab to save currently failed delivery into a CSV file for future reference.
- Incoming – Click on this tab to display all incoming failed delivery.
- Unknown – Click on this tab to display somehow unknown delivery.
- Time – Displaying date and time that failed delivery takes place.
- Subject – Displaying subject of failed delivery e-mail messages.
- Account – Displaying sender’s e-mail address.
- From – Displaying sender’s e-mail address.
- To – Displaying recipient’s e-mail address.
- Mail Log – Keep track of date, time, sender, recipient, subject, delivery result and result:
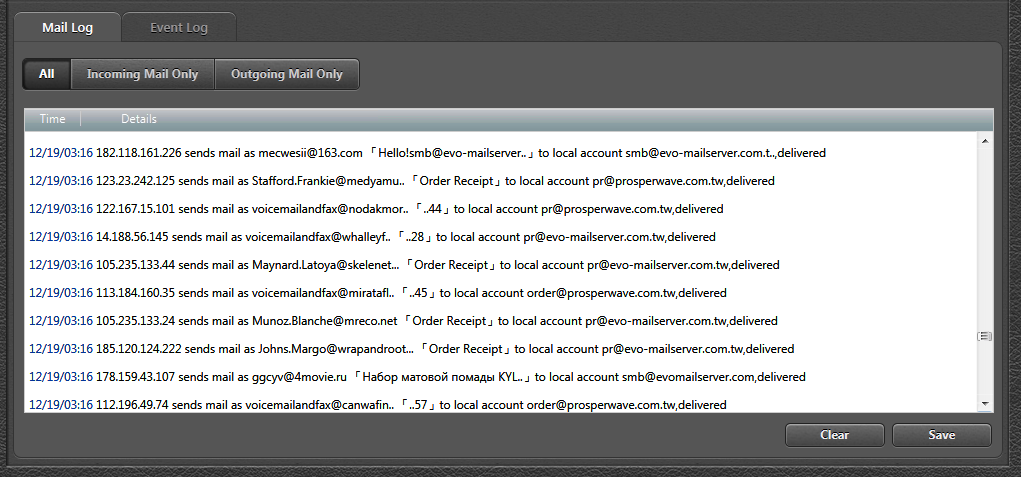
- All – The log displays both incoming and outgoing e-mail message delivery.
- Incoming Mail Only – The log displays incoming e-mail message delivery only.
- Outgoing Mail Only – The log displays outgoing e-mail message delivery only.
- One touch log viewing – Pointing mouse icon to reveal more about mail log:
- One touch log – All incoming/outgoing mails have recorded logs. Along every line within log, there are several places where you place your mouse pointer to trigger pop-up messages for more details
- For outgoing mail delivery – Two steps to send outgoing e-mail messages: Queue and Deliver:
- Time stamp – Giving full YYYY/MM/DD HH:MM:SS time stamp.
- Sender’s IP address – The IP address of local mail account initiating the mail sending attempt.
- Subject – Click on the subject to open and view the e-mail message content.
- Recipient mail account – Addressing recipient’s domain, MX host, IP address, mail protocol and delivering status.
- For incoming mail delivery – Once e-mail messages come in, several anti-spam checks will take place before reaching recipient’s mailbox:
- Time stamp – Giving full YYYY/MM/DD HH:MM:SS time stamp.
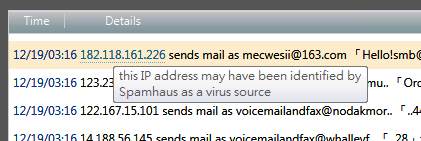
- Sender’s IP address – The IP address where the outside sender was initiating the mail sending attempt. If the sender’s IP is identified as spam source, EVO Mail Server will inform you:
- Subject – Click on the subject to open and view the e-mail message content.
- Examples of log reading – Regularly, legit e-mail messages have no problem to go in and out. There are hundreds of spam mails trying to penetrate in. We need to know how to read logs when something is abnormal:
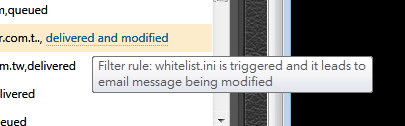
- In case of incoming e-mail messages having problem on its originating IP address being found as spam source, violating SPF rule or violating/triggering EVO’s Filtrolysis’s filter rules/blacklist/whitlist, a pop-up message upon placing your mouse pointer and this mail will be placed into SPAM folder:
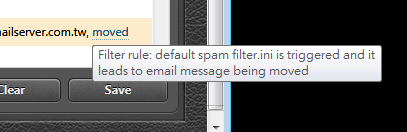
- In case of incoming or outgoing e-mail messages having problem on the invalid destination domain, the invalid SMTP syntax error, or invalid destination server’s MX record, a pop-up message upon placing your mouse pointer and this mail are placed in slot queue waiting for another delivery:
- In case of incoming e-mail messages having problem on its originating IP address being found as spam source, violating SPF rule or violating/triggering EVO’s Filtrolysis’s filter rules/blacklist/whitlist, a pop-up message upon placing your mouse pointer and this mail will be placed into SPAM folder:
- Event Log – This log provides three types of events taking place throughout server operation as below:
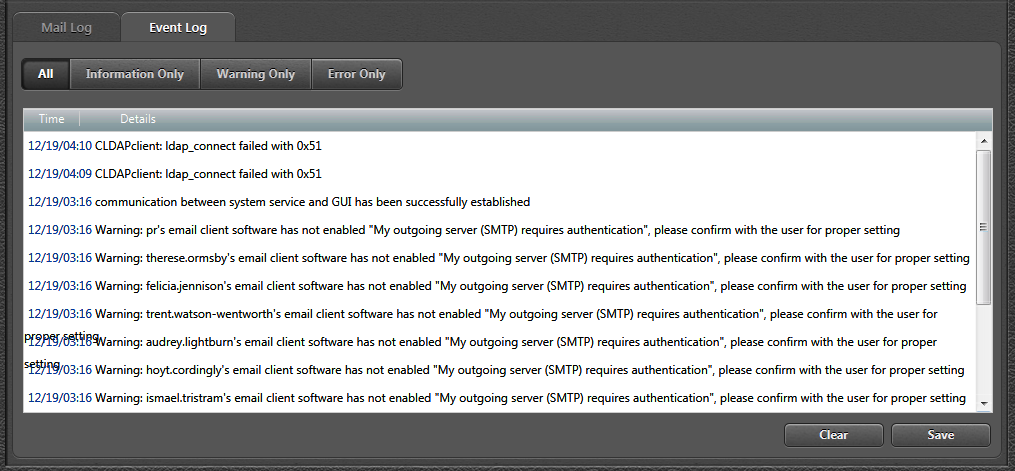
- All – Displaying all events with times stamp and its content.
- Information Only – Displaying informational events only with time stamp and its content. This relates to mail server operational notification.
- Warning Only – Displaying warning events only with time stamp and its content. This relates to login failures most of the time.
- Error Only – Displaying error events only with time stamp and its content. This relates to mail system error.
- Mail Server Real-Time Statistics – EVO Mail Server provides numbers of several useful parameters in real-time:
-
Filter – Mail content filtering based on RFC headers:
- Filter rules – Filter rules are filtering in the order that appears from top to bottom.
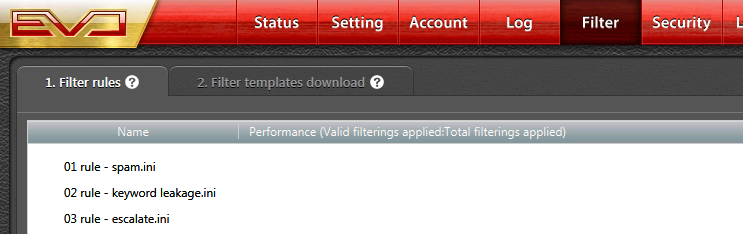 If actions of Deleting message, Moving message, or Postponing message delivery are carried out, then all following filter rules will not proceed.
  Click on New button to add a new filter rule. Filter editing instruction will be explained in next section.
 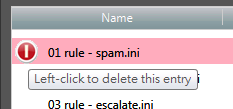 Click on an existing rule to open a editing window. Move mouse cursor to the left of an existing rule till it turns red and click on the red circle to delete it.
- Filter rule editing – Filter rule editing includes four major part as the following:
- Rule description – Basic rule naming and enable/disable status:
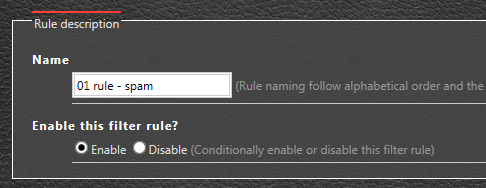
- Name – Name the rule. Note: The orders of rules are according to the first character in numeric order and then in alphabetical order.
- Enable this filter rule? – Enable or disable this rule during filter process.
- Target – Define target by narrowing down from domain, department to user account:
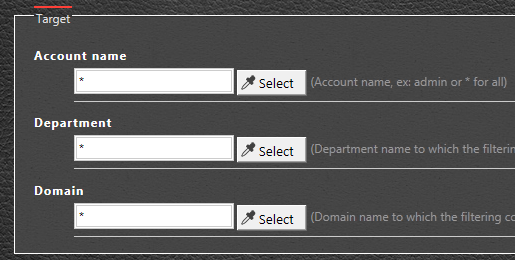
- Account name – Pick a mail account by clicking on Select button or use * to include all mail accounts.
- Department – Pick a department by clicking on Select button or use * to include all departments.
- Domain – Pick a domain by clicking on Select button or use * to include all domains.
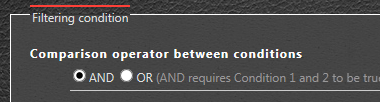
- Filtering condition – Comparison between conditions and specific condition elements such as compared mail headers and compared objects:
- Comparison operator between conditions – Click on AND or OR between all valid conditions in order to validate the rule as TRUE or FALSE.
- Choose and edit rule – Four elements compose a complete rule. They are:
- Condition timing – When to initiate a comparison?
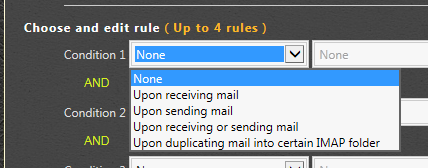
- Upon receiving an e-mail message.
- Upon sending an e-mail message.
- Upon receiving or sending e-mail message.
- Upon duplicating e-mail message to a selected IMAP folder.
- Compared mail header – What mail header is to be compared?
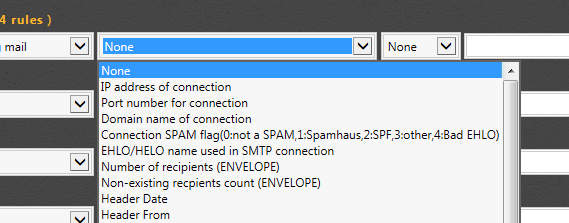
- None – Leave value of this field null.
- IP address of connection – a IP address from which mail client establishes the connection.
- Port number for connection – Port number being used by mail client during an established connection.
- Domain name of connection – domain name of connection that matches the IP address of connection.
- Connection SPAM flag (0:not a SPAM, 1:Spamhaus, 2:SPF, 3:other, 4:Bad EHLO) – as described.
- EHLO/HELO name used in SMTP connection – as described.
- Number of recipients (ENVELOPE) – as described.
- Non-existing recipients count (ENVELOPE) – as described.
- Header Date – format as: Fri, 02 Dec 2011 17:42:49 +0800, can be sued in RegEx to filter out mails from future.
- Header From – sender of the mail.
- Header In-Reply-To – a message-ID used to link related messages together.
- Header To – recepient of the mail.
- Sender on envelope (ENVELOPE MAIL FROM) – header of sender on email envelope.
- Recipient on envelope (ENVELOPE RCPT TO may be multi-value CSV)
- Header Bcc (Bcc recipient) – as described.
- Header Cc (Cc recipient) – as described
- Header Subject – topic of the mail
- Header Subject excluding punctation marks (~^{}|,./*- and space) – as described.
- String length of header subject (Unicode) – as described.
- ISO CHARSET for mail subject and content – as described.
- Body text (1st and 2nd part) – as described.
- Raw body text, undecoded – as described.
- Attachment filenames (may be multi-value CSV) – message’s attachment with specified filename.
- Attachment extension names (may be multi-value CSV) – message’s attachment with specified file extension.
- Header Content-Disposition – specifying mail presentation style.
- Header Content-Transfer-Encoding – indicate the type of transformatoin turning body suitable for transport.
- Header Content-Type – describing the data contained in the body.
- Header DKIM-Signature – displaying various DKIM-related tages.
- Header Message-ID – message id that is unique for each instance of the message.
- Header MIME-Version – multimedia internet mail extension version number, usually it is 1.0.
- Header Received – a list of all the servers/computers through which the message traveled in order to reach you.
- Header References – displaying structure of a thread.
- Header X-mailer – shows which mail client software the sender uses to send the message.
- Head Disposition-Notification-To – a way to notify the sender about the ultimate disposition of the message.
- Specified folder name – to which message is being dragged to.
- This mail has been through (number)th Filtrolysis processes – as described.
- Always perform action – regardless of the condition, forcing EVO to perform selected action below.
- Expression or operand – Select one of the following operand to proceed comparison:
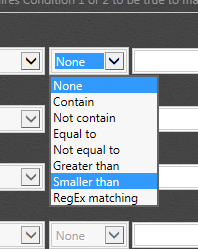
- None – Leave value of this field null.
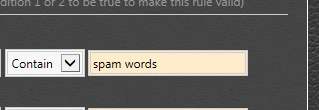
- Contain – Compared mail header contains the compared value.
- Not contain – Compared mail header does not contains the compared value.
- Equal to – Compared mail header is equal to the compared value.
- Not equal to – Compared mail header is not equal to the compared value.
- Greater than – Compared mail header is greater than the compared value.
- Smaller than – Compared mail header is smaller than the compared value.
- RegEx matching – Compared mail header matches RegEx outcome compared value.
- Compared value – Value that you use to compare against compared mail header through operand.
- Condition timing – When to initiate a comparison?
- Comparison operator between conditions – Click on AND or OR between all valid conditions in order to validate the rule as TRUE or FALSE.
- Action – Follow-up action and rule execution afterwards.
- Select an action – A list of actions to take when a condition is met. More parameter(s) may be required for the selected action to execute:
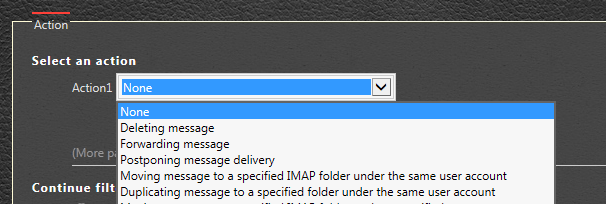
- None – Leave value of this field null.
- Deleting message – Mail will not be delivered.
- Forwarding message – Mail will be delivered through SMTP service.
- Postponing message delivery – Mail delivery will be delayed for about 1 hour.
- Moving message to a specified IMAP folder under the same user account – Moving mail only, no mail delivery.
- Duplicating message to a specified folder under the same user account – Both duplicating mail and mail delivery.
- Moving message to a specified IMAP folder under a specified user account – Both moving mail and mail delivery.
- Duplicating message to a specified IMAP FOLDER UNDER A SPECIFIED USER ACCOUNT – Both moving and mail delivery.
- Treating as spam and move it to SPAM folder under the same user account – as described.
- Flag this TCP connection as SPAM connection – as described.
- Remove SPAM flag for this TCP CONNECTION – as described.
- Add peer IP address into IP deny list – as described.
- Add peer IP address into IP white list – as described, if whitelisted IP needs to be blocked later, go to Security tab.
- Re-sending message to the originally specified recipient – mail will be resent when placed in an assigned resent folder.
- Putting a remark in message subject – This feature also puts a remark on resent or forwarding mail so be careful.
- Insert header (key: value) – as described.
- Name of file(s) to be removed – as described.
- Extension or file types of file(s) to be removed – as described.
- Insert text at the beginning of email message body – Unified signature may be placed within mail.
- Append text at the end of email message body – Unified signature may be placed within mail
- Do not archive this email message – fiter-qualified mails will be archived.
- Route SMTP outbound traffic through specific IP and custom EHLO name – as described.
- Continue filter rule execution if action is triggered? – Once an action is taken, make decision whether to carry on the following filter rule or not. Click Yes to continue or click No to stop.

- Select an action – A list of actions to take when a condition is met. More parameter(s) may be required for the selected action to execute:
- Rule description – Basic rule naming and enable/disable status:
- Filter rule editing – Filter rule editing includes four major part as the following:
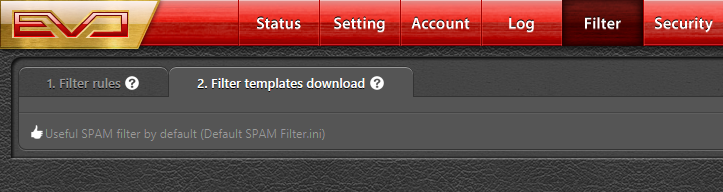
- Filter templates download – EVO Mail Server provides a default filter file to be downloaded. This filter contains commonly seen keywords used by spammers as well as a sample useage of RegEX.
- RegEx – Use Regular Expression to enhance filtering effectiveness:
- Normally, a word can be expressed in different combinations of upper case and lower case. For example, spam keyword like porn can look like Porn, pOrn, PORN, porn and many others. If we were to compare all possibilities one by one, then it will be a very inefficient way. If we use Regular Expression, then only one short line is required: {[pP][oO][rR][nN]}.
- For a complete reference on RegEx, please visit Microsoft’s website of Regular Expression Language – Quick Reference.
- To utilize RegEx, select RegEx matching in Expression or operand pull-down list. Then, enter RegEx string in Compared value space.
- Filter rules – Filter rules are filtering in the order that appears from top to bottom.
-
Security – White list , black list, IP filter, SMTP-Auth free list, Alias list and etc:
- IP-Based Connection Security Settings – Two types of IP List regulating access to the mail server are available:
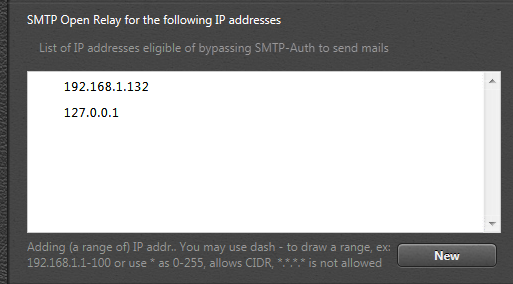
- SMTP Open Relay for the following IP addresses – Mail clients connecting through IP addresses in this list are allowed to by-pass SMTP-Auth and send e-mail messages. Click on New button to add IP address. Rules are below IP list space for your reference.
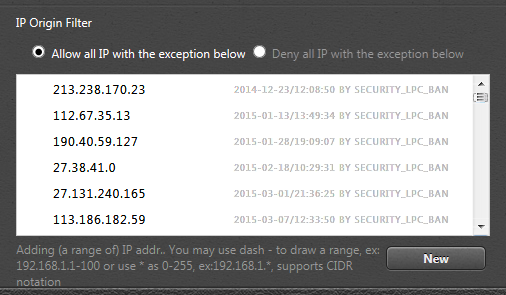
- IP Origin Filter – Click on either Allow all IP with the exception below or Deny all IP with the exception below to define Allow or Deny orientation. Click on New button to add IP address. Rules are below IP list space for your reference. Note: if BY SECURITY_LPC_BAN appears next to listing date, then it means this IP is banned because too many invalid logins within a short period of time.
- SMTP Open Relay for the following IP addresses – Mail clients connecting through IP addresses in this list are allowed to by-pass SMTP-Auth and send e-mail messages. Click on New button to add IP address. Rules are below IP list space for your reference.
- IP Address Whitlist/Domain Name Blacklist Settings – Two types of lists regulating incoming mail traffic:
- IP Address Whitlist – E-mail messages from IP addresses in this list will by-pass all available anti-spam, anti-virus and SPF-check. Normally, we can add IP address within specified mail server’s MX record for future by-passing purposes. Click on New button to add IP address. Rules are below IP list space for your reference.

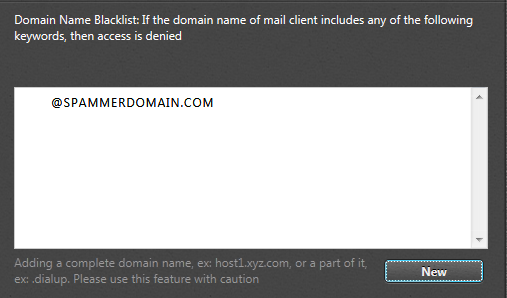
- Domain Name Blacklist – Mail clients cannot connect or to benefit from EVO Mail Services from domain that contain keywords in the list. Click on New button to add IP address. Rules are below IP list space for your reference.
- IP Address Whitlist – E-mail messages from IP addresses in this list will by-pass all available anti-spam, anti-virus and SPF-check. Normally, we can add IP address within specified mail server’s MX record for future by-passing purposes. Click on New button to add IP address. Rules are below IP list space for your reference.
- Alias list/SMTP deliveries limitation per domain per hour – Two convenient tools on handling e-mail account alias and SMTP delivery control:
- Alias list – Adding alias for particular e-mail account or the whole domain. Click on New button to add alias pairing. Rules are below alias list space for your reference. For Catch-All issue, we first create a mail account called catchall and add a pair of *@domain=catchall@domain. Once this pair is created, all e-mail messages sent to non-existing e-mail accounts or typo e-mail accounts will be stored here for future reference.

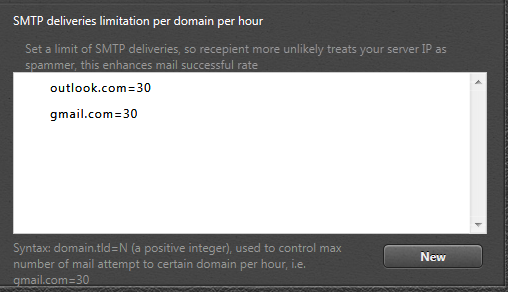
- SMTP deliveries limitation per domain per hour – Set a upper limit to number of outgoing e-mail messages per domain per hour. Such setting will likely to enhance successful rate of e-mail delivery by manipulating a reasonable delivery attempts per domain per hour. Click on New button to add alias pairing. Rules are below alias list space for your reference.
- Alias list – Adding alias for particular e-mail account or the whole domain. Click on New button to add alias pairing. Rules are below alias list space for your reference. For Catch-All issue, we first create a mail account called catchall and add a pair of *@domain=catchall@domain. Once this pair is created, all e-mail messages sent to non-existing e-mail accounts or typo e-mail accounts will be stored here for future reference.
- IP-Based Connection Security Settings – Two types of IP List regulating access to the mail server are available:
-
License – EVO Mail Server licensing information:
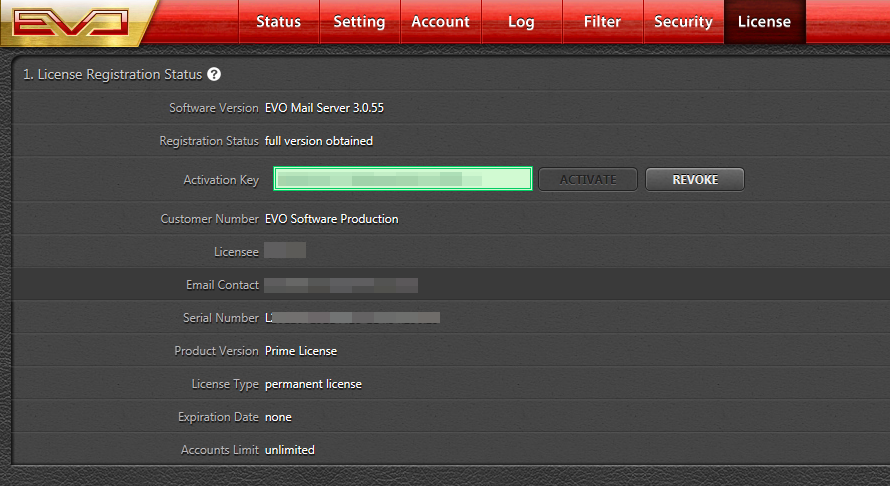
- License Registration Status – Your license activation status and registration info:
- Software Version – Displaying current installed version of EVO Mail Server. When a software update is available, an update link will appear.

- Registration Status – Displaying current registration status of either full version or trial version.
- Activation Key – Issued activation key from EVO software production:
- ACTIVATE – Once license is purchase, enter the issued license key in space provided and click on ACTIVATE to register
- REVOKE – Click on REVOKE button to move license key elsewhere
- Customer Number – Name of organization under which this EVO Mail Server license key is entitled to.
- Licensee – Name of individual under whom this EVO Mail Server license key is entitled to.
- Email Contact – Primary contact provided by licensee for this EVO Mail Server license key and for future software news update.
- Serial Number – A unique serial number generated for this EVO Mail Server license key.
- Product Version – Displaying whether this EVO Mail Server license is registered or trial version and whether EVO Collaborator Add-in is installed.
- License Type – Displaying whether this EVO Mail Server license key is Prime or Standard version.
- Expiration Date – Displaying this EVO Mail Server license is a perpetual license.
- Accounts Limit – Displaying number of e-mail accounts allowed to connect to this EVO Mail Server service simultaneously.
- Software Version – Displaying current installed version of EVO Mail Server. When a software update is available, an update link will appear.
- License Registration Status – Your license activation status and registration info:
-