
Exporting Outlook 2013/2016/2019 calendar to Excel, iCal and CSV formats
An ideal way to export your Outlook calendar is to synchronize between your cloud calendar such as Google and your Outlook 2016 with some sync Outlook add-in like EVO Collaborator for Outlook. However, when such synchronization is not available, you can still manually export your Outlook calendar to your local storage by some mean. Besides EVO’s Power Toys for Outlook (Click to download),
![]()
Outlook 2013/2016 generally provides 4 formats that calendar can be exported into with some downfall which we will talk about later in this article. Let’s first brief what these 4 formats are:
Quick tutorial video: here is a short tutorial video if you don’t have time to read.
iCalendar or vCalendar: Export Outlook calendar to iCal or ICS
- First, refer to Difference Between iCal & vCal that explains differences between iCalendar and vCalendar. Then, you can make decision whether you want to export into iCalendar or vCalendar file format.
- Secondly, there are two major issues that bother users a lot:
- Character encoding: Here is an example: if you install the Korean version of Outlook and your calendar event contains any Japanese hiragana or katakana, then these Japanese characters will appear as corrupted characters in the exported vCalendar files even though they look OK in Outlook before exporting.
- Windows Time Zone vs. Olson Time Zone: Windows Time Zone system is only used under Windows itself while the rest of the world has been using Olson Time Zone. If you export your calendar events to elsewhere such as Google Calendar or other calendar services, then the receiving party will not be able to recognize it and fail the import.
- Export:
- iCalendar has a file extension of .ics while vCalendar uses .vcs. Under Outlook, each of these .ics or .vcs file counts toward one event and it can be imported back in. The downfall of saving events into .ics or .vcs files is that you can only save one event at a time. Up to some point, it is not practical when trying to import a large number of events at once. If you try to select all your events and save them, you would end up with one single TXT file instead. This TXT file cannot be used for import and it is probably good for printout.
- You can follow the steps below to save your calendar event as .ics or .vcs file: (We use Outlook 2016 in tutorials throughout this article)
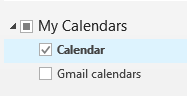
- Click on Calendar at lower-left.

- Click on selected calendar event in the selected calendar folder under Navigation Pane of My Calendars.
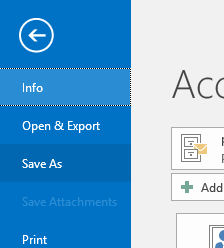
- Click on File at top-left.
- Select Save As.
- Browse to location where you will be saving the iCalendar or vCalendar file.

- In the field below File name:, select vCalendar Format or vCalendar Format.
- Click on radial of Save Selected Appointment or Save Calendar <calendar name>; Whole calendar; Full details along with options in More Options….
- Click on Save button.
- Click on Calendar at lower-left.
- Regarding character encoding in .VCS file format, if you open the .VCS file with a text editor such as UltraEdit or Notepad, you will find that if the event contain characters other than ASCII and the language version your Outlook was installed are all corrupted.
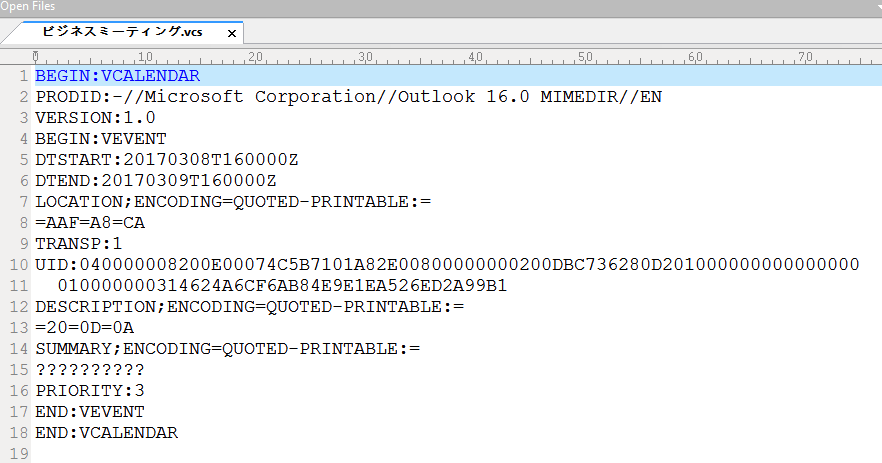
- This character corruption is irreversible even after importing back to Outlook. This is what it looks like:
- If you have e-mail access, then there is another way to compliment the above one-by-one iCalendar or vCalendar saving solution:
- Click on Calendar at lower-left.
- Select the calendar folder you want to export under Navigation Pane of My Calendars.
- Click on VIEW from ribbon at top.

- Select Change View to the left.
- Click on List view below.
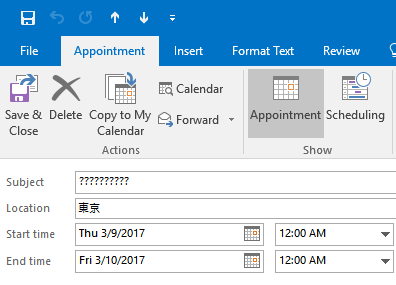
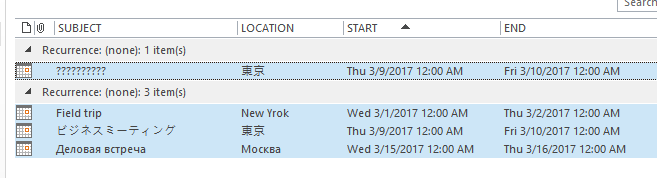
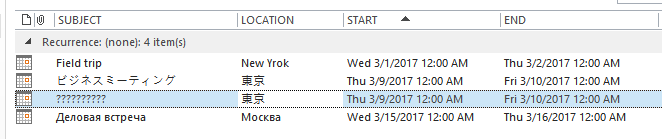
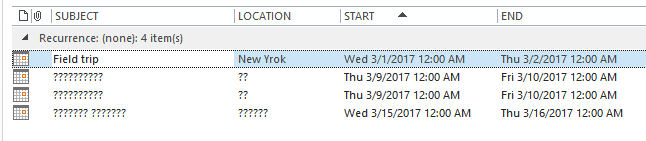
- Once calendar view changes to List, use hotkey of CTRL + A to select all calendar events and CTRL + C to copy all of them. Please note that the entry with a series of ? is the experiment result of importing .vcs back into Outlook; thus, please disregard it.
- Click on Mail at lower-left.

- Click on New Email at top-left.
- Fill in e-mail address you want to send your calendar events backup to.
- Click on body section of the newly created e-mail.
- Use hotkey of CTRL + V to paste all the calendar events you just copied to clipboard.

- Click on Send button to send calendar events to your e-mail address.
- Click on Calendar at lower-left.
- Import:
- There are two methods to import your iCalendar & vCalendar files back to Outlook. One is through Outlook’s Import wizard:
- Click on FILE at top-left.
- Click on Open & Export.
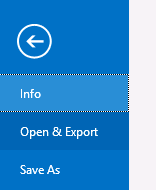
- Select Import/Export.
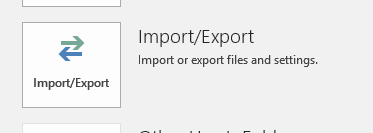
- Select Import an iCalendar (.ics) or vCalendar (.vcs) and hit Next >.
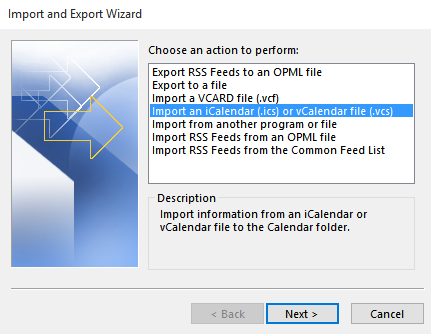
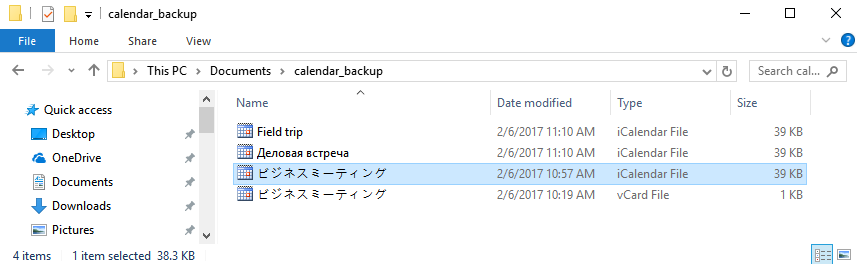
- Browse to the folder where you vCard file is located.
- In file type pull-down list, select iCalendar Format or vCalendar Format depending on what file type you will be importing.
- Select the file and click on Open.
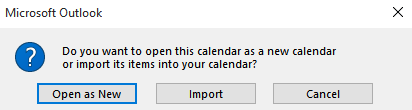
- In the next popup window, click on Open as New to create a new calendar event or Import to import directly to your Outlook default folder.
- Please note that the entry with a series of ? is the experiment result of importing .vcs back into Outlook:
- Click on FILE at top-left.
- The above method will import iCalendar or vCalendar file to your Outlook default folder. Therefore, it may not fit your need if you want the calendar entry to be imported at your specified location other than Outlook default folder. Yet, it is not efficient because it only imports one calendar entry at a time.
- Another method is is through old-school Copy & Paste:
- Open Windows Explorer.
- Browse to the folder where your iCalendar or vCalendar files are located.
- Select one iCalendar or vCalendar file at a time.
- Use CTRL + C to copy all selected iCalendar or vCalendar files onto clipboard.
- Go back to Outlook and click on Calendar at lower-left.
- Select the calendar folder where you want to import calendar entries under Navigation Pane of My Calendars.
- Use CTRL + V to paste all iCalendar or vCalendar files from clipboard.
- At this point, what you need to do is to click on Save & Close button at top-left of the calendar entry.
- Please note that the entry with a series of ? is the experiment result of importing .vcs back into Outlook:
- Note: .ics (iCalendar) files exported can also be imported into Thunderbird while vcs (vCalendar) is not an option.
- There are two methods to import your iCalendar & vCalendar files back to Outlook. One is through Outlook’s Import wizard:
CSV: Export Outlook calendar to CSV
- Export:
- CSV (Common Separated Values) file is commonly used to store data for import and export in various software applications. Outlook uses CSV to store its calendar event information since common (,) can be conveniently used to separate all fields. However, exporting Outlook calendar events into a CSV file has a potential character encoding issue that characters other than ASCII and the language version your Outlook was installed contained in the calendar event will be corrupted. For example, if you install the Korean version of Outlook and your calendar events contain any Japanese hiragana or katakana,which are not in UTF-8 or Unicode, then these Japanese characters will appear as junky characters or question marks in the exported vCard files even though they look OK in Outlook before exporting.

- One good thing about using CSV is that you export the whole calendar folder or sub-folder as a whole. The following steps will walk you through on how to do it:
- Click on File at top-left.
- Click on Open & Export.
- Select Import/Export.
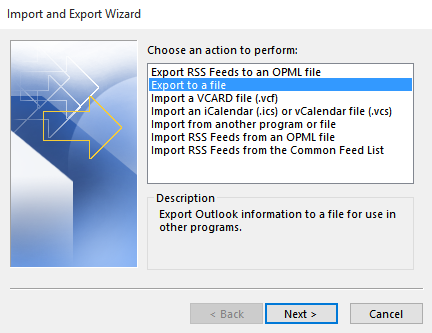
- Select Export to a file and click on Next >.
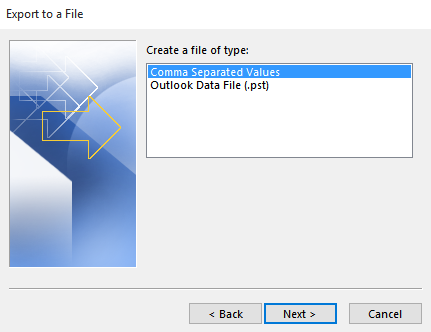
- Keep Common Separated Values selected and click on Next >.
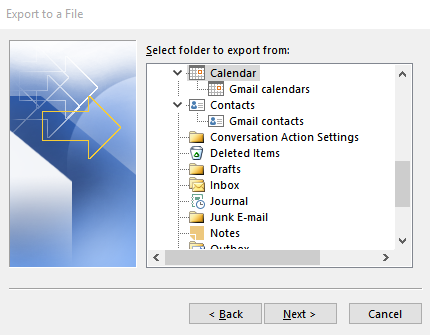
- Select calendar folder you want to export and click on Next >.
- Click on Browse button to browse a location for saving file.
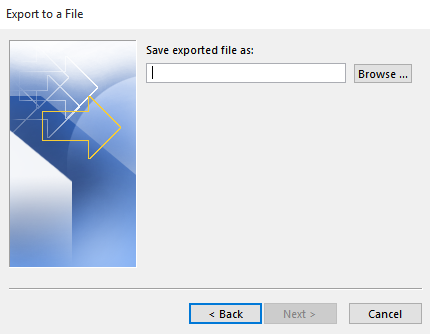
- Enter file name and then click on OK and Next >.
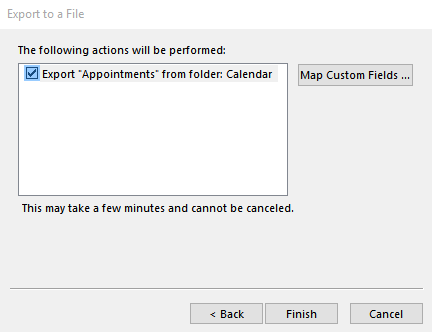
- Click on Finish.
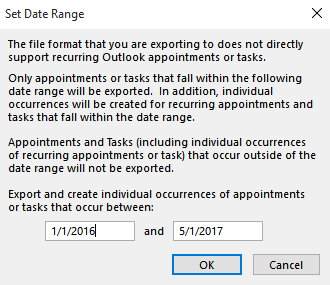
- Enter date range of date during which appointments will be exported and click on OK. (Note that only part of recurring appointments falling into the date range will be exported.)
- As an export result, non-ASCII or non-Unicode foreign characters will end up series of question marks that we mentioned earlier in this section.
- Click on File at top-left.
- CSV (Common Separated Values) file is commonly used to store data for import and export in various software applications. Outlook uses CSV to store its calendar event information since common (,) can be conveniently used to separate all fields. However, exporting Outlook calendar events into a CSV file has a potential character encoding issue that characters other than ASCII and the language version your Outlook was installed contained in the calendar event will be corrupted. For example, if you install the Korean version of Outlook and your calendar events contain any Japanese hiragana or katakana,which are not in UTF-8 or Unicode, then these Japanese characters will appear as junky characters or question marks in the exported vCard files even though they look OK in Outlook before exporting.
- Import:
- Outlook provides an import wizard to facilitate bringing calendar entries stored in CSV files:
- Click on FILE at top-left.
- Click on Open & Export.
- Select Import/Export.
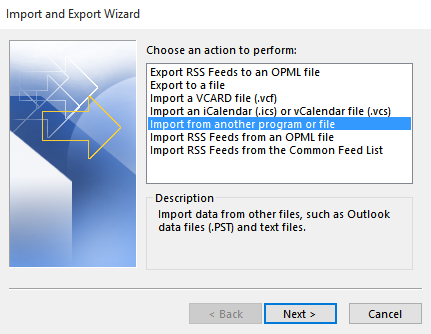
- Select Import from another program or file.

- Keep Common Separated Values selected and click on Next >.

- Click on Browse to the folder location where you keep the CSV file.
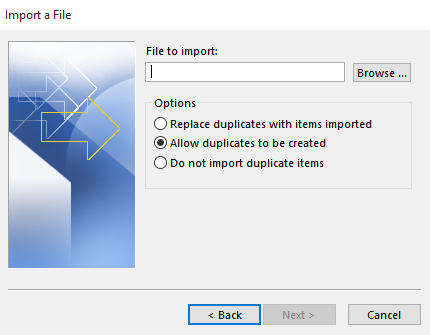
- Click on one of radials under Options.
- Select a calendar folder as your destination in the folder tree and hit Next >.
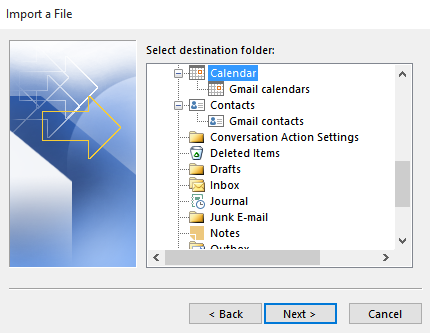
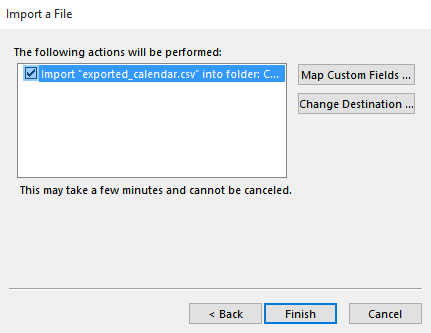
- Make sure item in action list is checked and click on Finish.
- Click on FILE at top-left.
- As an import result, non-ASCII or non-Unicode foreign characters will end up series of question marks that we mentioned earlier in this section.
- CSV file exported from Outlook cannot be imported to Thunderbird perhaps due to incompatibility of field positioning.
- Outlook provides an import wizard to facilitate bringing calendar entries stored in CSV files:
Excel Spreadsheet: Export Outlook calendar to Excel 2016/2013
- Export:
- Outlook calendars are usually displayed in Calendar view. If we like to simply copy & paste Outlook calendar to Excel spreadsheet, then we need to change view to List view. By looking at the List view, some of the fields we use within calendar events may not be seen. Therefore, we need to make them visible before exporting. How? We add items via Add Columns.
- Copy & pasted calendar entries with foreign language characters are looking OK within Excel because Excel supports multi-languages. However, exporting the CSV file will result the same character encoding issue like exporting .VCS producing junky characters above.
- The following steps will export Outlook calendar events via Copy & Paste method:
- Click on Calendar at lower-left.
- Select the calendar folder you want to export under Navigation Pane of My Calendars.
- Click on VIEW ribbon at top.
- Select Change View to the left.
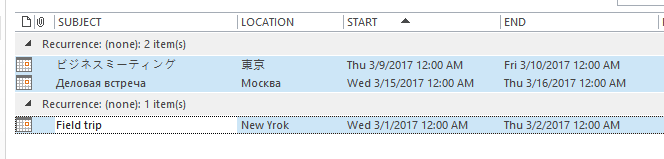
- Click on List and calendar events will appear in a listing fashion.
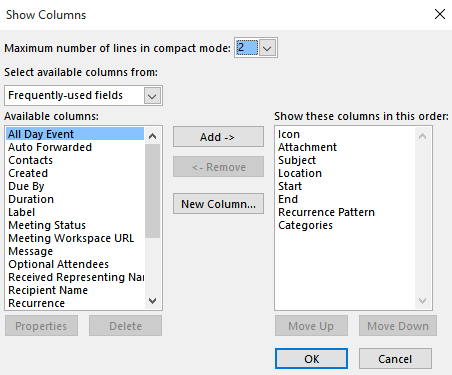
- If additional fields need to be included, click on Add Columns.
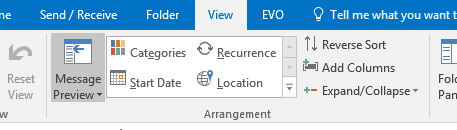
- Select field such as Due By to the left and click on Add -> button. Then, Due By will appear in the list to the right. If you need to re-arrange order of fields, then select fields and click on Move Up or Move Down to change position. When you finish, click OK to leave the Window.
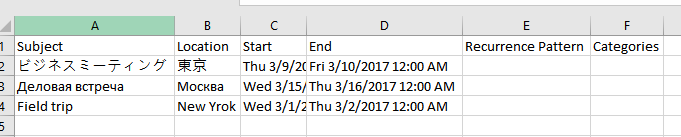
- Use hot key of CTRL + A to select all calendar entries and use CTRL + C to copy them onto clipboard.
- Switch to Excel where you open a new workbook. Use CTRL + V to paste all copied entries.
- Click on Calendar at lower-left.
- Import:
- How do we import the saved Excel file back to Outlook since XLSX file extension is not an option in import source list? This is easy! What we do is save the workbook into a CSV file and follow the CSV import steps above. To save workbook files as CSV files, follow the steps below:
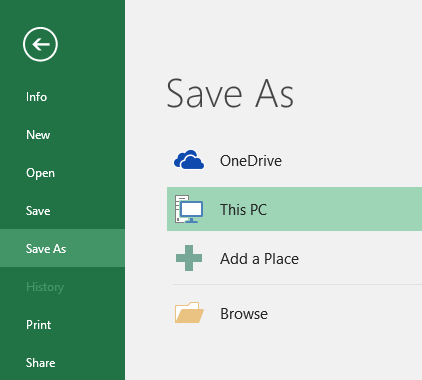
- In Excel application, open the Excel file and click on FILE at top-left.
- Select Save As to the left.

- Click on Browse icon to browse the folder location where you want to save the CSV file.
- Pick a name for the CSV file.
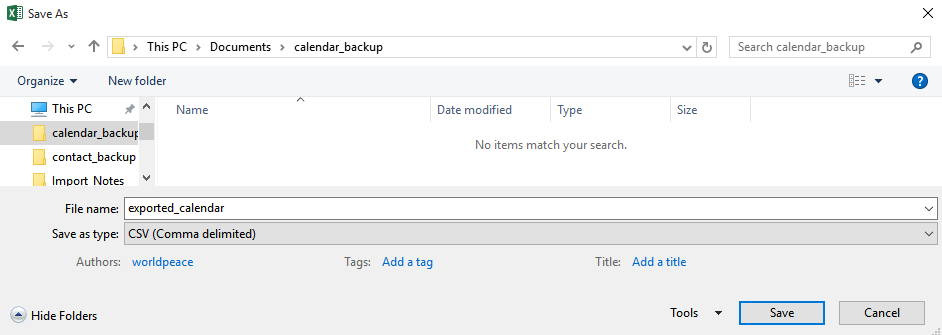
- Click on Save as type pull-down list and select CSV (MS-DOS) or CSV (Comma Delimited).
- In Excel application, open the Excel file and click on FILE at top-left.
- As an import result, non-ASCII or non-Unicode foreign characters will end up series of question marks that we mentioned earlier in this section.

- How do we import the saved Excel file back to Outlook since XLSX file extension is not an option in import source list? This is easy! What we do is save the workbook into a CSV file and follow the CSV import steps above. To save workbook files as CSV files, follow the steps below: