Skip to content
Mail client software accessing EVO Mail Server
-
SMTP with IMAP – Here is a general guide on how to configure mail software to use IMAP protocol to receive e-mail messages (We use Outlook 2016 as an example):
- Click on File at top-left.

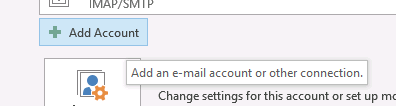
- Click on + Add Account.
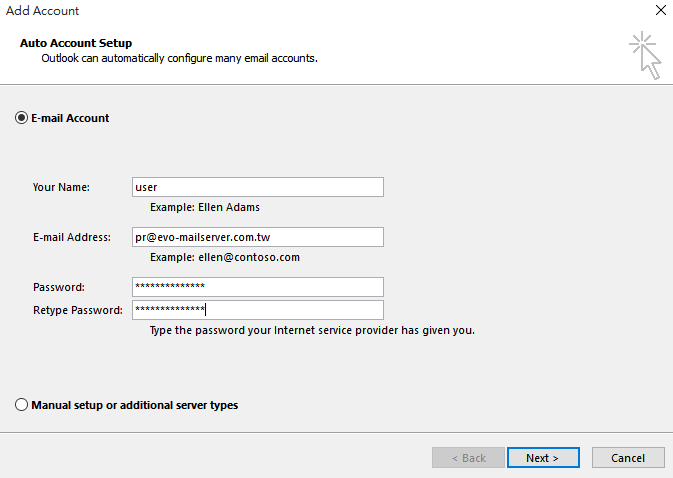
- Fill in Your name, E-mail Address and password and click on Next >.
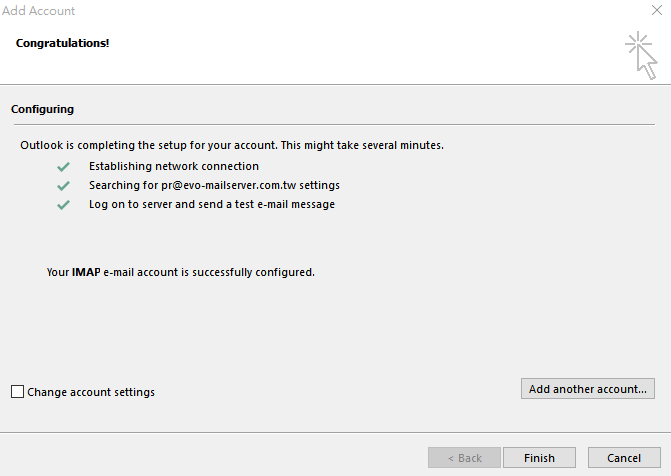
- After 10 to 15 seconds of auto-discovery, your IMAP is successfully configured and click on Finish to exit Add Account window.
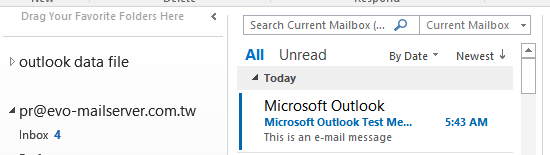
- At Navigation Pane to the left, you will see folders for your e-mail account.
-
SMTP with POP3 – Here is a general guide on how to configure mail software to use POP3 protocol to receive e-mail messages (We use Outlook 2016 as an example):
- Click on File at top-left.
- Click on + Add Account.
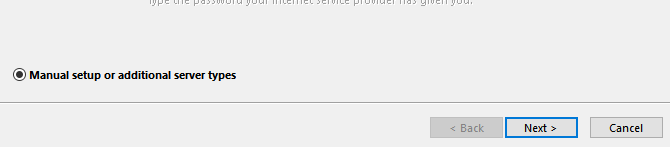
- Since Outlook 2016’s account auto-detection will choose IMAP by default, to configure a POP3 e-mail account, we click on Manual setup or additional server types and click on Next > at lower-right.
- Select POP or IMAP and click on Next >.

- Enter Your name, E-mail address, Incoming mail server, Outgoing mail server (SMTP), User Name (full e-mail address), Password.
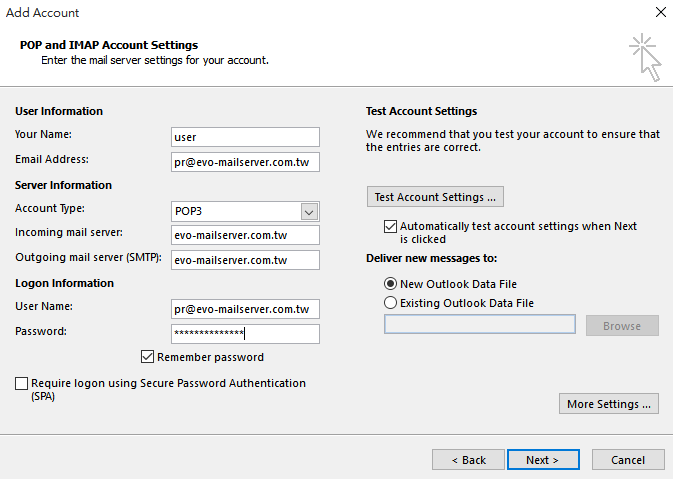
- Note that both Incoming mail server and Outgoing mail server (SMTP) should be host name on MX record.
- Click on More Settings….
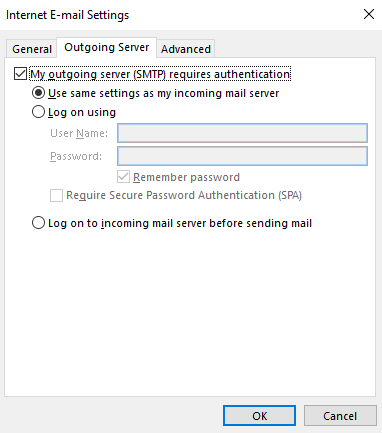
- Click on Outgoing Server tab and check the box next to My outgoing server (SMTP) requires authentication.
- Click on Advanced tab.
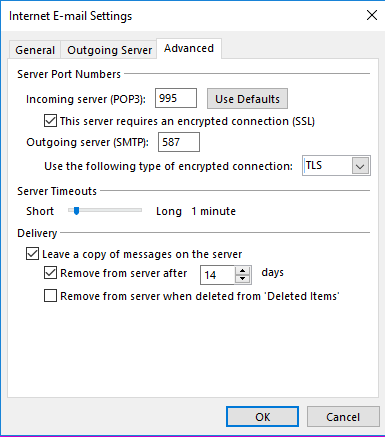
- To be secure, check the box next to This server requires an encrypted connection (SSL).
- Check This server requires an encrypted connection (SSL) and Incoming server (POP3) will change to 995.
- Change Outgoing server (SMTP) to port 587 and change from None to TLS on Use the following type of encrypted connection.
- Then, click on OK and Next > to initiate a testing phase of authenticating, sending, and receiving.
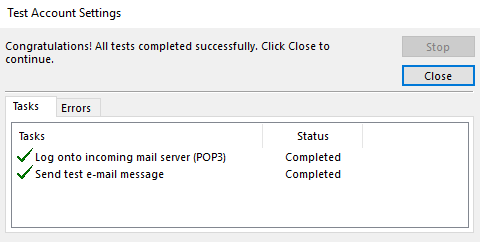
- Once test is finished, click OK to quit Add Account wizard.
-
CardDAV and CalDAV – EVO Mail Server Prime edition provides CardDAV and CalDAV services for various clients to synchronize their contacts, calendars and tasks:
- Configure CardDAV and CalDAV services on EVO Mail Server:
- Download and install Microsoft VC Distributable 2008 SP1.
- On EVO Mail Server GUI, click on Setting and scroll down to 9. EVO Collaboration Add-on: CardDAV and CalDAV Setting.
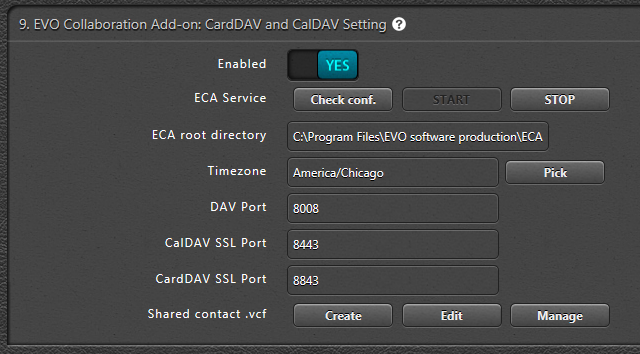
- Set Enabled to YES.
- On ECA Service, click on Check conf. and click YES at the next prompt to download EVO Collaboration Add-on pack.
- Once the download is complete, click Run to install ECA.
- Click Next for three times and exit.
- On ECA Service, click Check conf. and click Allow access.
- Then, we will see installation result and click OK.
- On Timezone, click to select your location and click OK.
- On ECA Service, click START.
- For CardDAV, you may now click Create, Edit, and Manage buttons next to Shared contact .vcf to manage company contact information if needed.
- Additionally, all e-mail accounts on EVO Mail Server will automatically be included in the global contact list unless administrator specifically exclude selected e-mail account within User Account editor.
- Configure various CardDAV and CalDAV clients to sync:
- Outlook 2007-2016 – EVO Collaborator for Outlook:
- Close Outlook if it is opened.
- Download EVO Collaborator for Outlook from EVO official website.
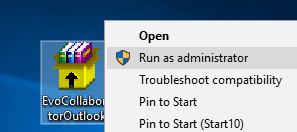
- Run EvoCollaboratorOutlook.exe with right-click and select Run as administrator.
 Note: The bit-version to be installed depends on Outlook’s bit-version rather than Windows’s. ECO will auto-detect bit-version of current Outlook. Installing a mismatched bit-version of ECO will result application error and the add-in will not work properly. How to check Office’s bit-version?
- During installation, ECO will detect if .NET Framework 4.5.x is installed. If not found, an automated .NET Framework 4.5.x installation will proceed.
- Upon installation completion, open Outlook and click on EVO ribbon at the top.
- Click on Configure Profile(s) to open Account window.
- Click on EVO – not configured at top-left.
- Enter EVO Mail Server’s IP or host name in space under Hostname (CardDAV/CalDAV) or webcal:// URL.
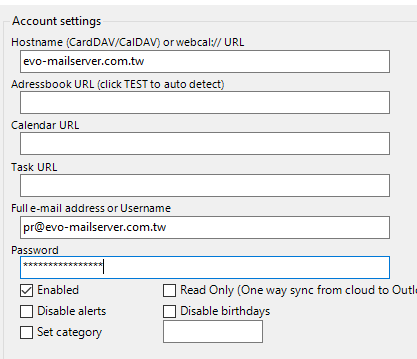
- Enter username or e-mail address in space under Full e-mail address or Username.
- Under Sync options, change to Outlook default folders by clicking the folder icon to the right as below: (This setup method is binding Outlook contacts, calendars and tasks with EVO’s e-mail account. If you do not wish to do so, then keep the default naming as they are or change names according to your preference.)
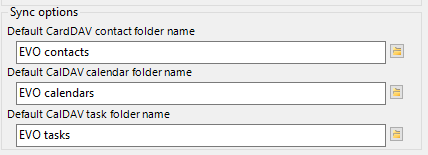
- Outlook Default Folder for:
- CardDAV contacts – \\Outlook\Contacts
- CalDAV calendars – \\Outlook\Calendar
- CalDAV tasks – \\Outlook\Tasks
- Click on TEST button to authenticate and perform URL auto-discovery.
- If your EVO e-mail account has multiple folders to store contacts, calendars and tasks, then you will see folder icon(s) next to the detected URLs shown as below. Click on the icons to select among multiple folders within popup window.

- Now, click on Apply and Quit to initiate a sync. session.

- Apple iOS – Built-in Apps for both contacts, calendars and reminders (tasks):
- Contacts:
- Navigate to Settings/Mail, Contacts, Calendars.
- Tap on Add Account and tap on Other.
- In CALENDARS area, tap on Add CardDAV Account
- In Server, enter server name such as mail.yourdomain.com.
- In User Name, Password and Description, enter information accordingly.
- Tap on Next at top-right. Once authenticated, you will see check marks before each line and tap on Done.
- Press Home button to exit.
- Tap on Contacts app icon.
- Once entered, tap on Groups at top-left to open group list.
- Tap on the mail.yourdomain.com group that you just created and you will see contacts within.
- Tap on + sign at top–right to add more contacts.
- Calendars:
- Navigate to Settings/Mail, Contacts, Calendars.
- Tap on Add Account and tap on Other.
- In CALENDARS area, tap Add CalDAV Account.
- In Server, enter server name such as mail.yourdomain.com.
- In User Name, Password and Description, enter information accordingly.
- Tap on Next at top-right. Once authenticated, tap on Done.
- Press Home button to exit and tap on Calendar app icon.
- Tap on Calendars app.
- You will see the mail.yourdomain.com section with the default folder checked.
- Tap on Done and go back to Calendar’s main page and view events.
- Reminders (Tasks):
- Calendars and Reminders are configured at the same time under the same account.
- Tap on Reminders.
- You will see the default folder and tasks to be done below.
- Tap + sign and select mail.yourdomain.com and input tasks as needed.
- Android – CardDAV-sync for contacts and CalDAV-sync for calendar:
- Log on your Google Play Store.
- Search for CardDAV-sync or CalDAV-sync (Not free).
- Download it and install.
- Once installed, open the app, tap on Add account and choose CardDAV or CalDAV.
- In Servername or URL space, enter EVO host name along with port number, such as: mail.yourdomain.com:8443 and mail.yourdomain.com:8843.
- Do not change Use SSL default setting
- In Username space, enter your complete email address, such as: [email protected] and then password.
- After tapping on Next, follow instruction.
- After opening Android’s built-in Contacts and Calendar, you will see address book and calendar.
- Apple OS X – Built-in Apps for both contacts, calendars and reminders (tasks):
- Contacts:
- Click on Apple menu at top-left and choose System Preferences from the pull-down menu.
- Click on Mail, Contacts & Calendars.
- Click on Other and then Add a CardDAV account. Then, click on Create.
- In User Name and Password, enter information accordingly.
- In Server, enter server name such as mail.yourdomain.com. Then click on Create.
- Launch Address book at the bottom of desktop. You will see contacts synchronized from the server.
- Click + sign at the bottom of Address book to add more contacts.
- Calendars:
- Click on Apple menu and choose System Preferences from the pull-down menu.
- Click on Mail, Contacts & Calendars.
- Click on Other and then Add a CalDAV account. Then, click on Create.
- In User Name and Password, enter information accordingly.
- In Server, enter server name such as mail.yourdomain.com. Then click on Create.
- Launch iCAL at the bottom of desktop. You will see events and tasks.
- Double-tap track-pad on Calendar to add new event.
- Double-tap track-pad on Reminders to add new task.
- Thunderbird for Windows – Lightning for calendar and SOGo Connector for address book:
- Lightning – This plug-in has been integrated into Thunderbird 38.0.1 or later version since 6/11/2015. Here are the steps to configure Lightning to synchronize with EVO Mail Server’s CalDAV services:
- Open Thunderbird.
- Click on Thunderbird Menu and select Add-ons Manager.
- Click on Extensions to the left and you will see Lightning add-on.
- Click on Options button in Lightning banner and click on Calendar tab.
- Make sure you have matching timezone by selecting location from the pull-down menu in Timezone section.
- Click on Thunderbird Menu. Select Events and Tasks and then Calendar.
- Right-click on space below Calendar list and select New Calendar….
- In the popup window, click on On the Network radial and then Next >.
- Click on CalDAV radial and enter calendar URL in the following format and click on Next >:
http://mail.yourdomain.com:8008/calendars/<username>/default/
- Name the calendar in space provided and select color of your preference.
- For e-mail address, you can ignore it or use the one in Thunderbird. Then, click Next > and Finish.
- NOTE: There is a serious security issue about Lightning that it requires NO username and password to subscribe a calendar/task. Yet, you can add, delete and change events and tasks. Use it only if you are aware of this matter.
-
Distribute contacts via VCF and etc… – One easy mouse-click to distribute company contact list:
- On a new comer’s first day, how does IT staff pass all colleagues’ contact information to the newbie? With a single mouse click, EVO Mail Server can distribute company’s contact list in .vcf file format through e-mail. Once user receives that file, he can import all colleagues’ contacts into address book of local e-mail software application.
- Click on Account tab and open up a user account profile.
- Scroll down to Send tools/information/notification emails section.

- Click on Deliver address book as vcf,ldif,adr.
- Then you will see a pop-up message as below indicating distribution is complete.
- As the user logs in his mail account, he will see an email from EVO contact list manager. Double-click any of the entries in attachment to import.
-
SSL, digital signature, and TLS certificate – What are they? When to use which one?
- The mostly commonly used certificate are described as below:
- SSL Certificate – This certificate is installed on mail server and it is for encrypted connections between mail server and its clients. Make sure the mail server has to obtain a CA-signed SSL certificate to prove its identity in front of mail clients so to establish encrypted connections.
- Digital signature – This signature is stored in mail client software. Mails with this unique signature proves sender’s identity to recipient. Examples are as below:
- When A sends mail to B, the mail includes A’s digital signature to prove this mail is genuinely from A. At the same time, B can use A’s signed certificate to encrypt the replying mail.
- When B is replying A, the mail includes B’s digital signature to prove this mail is genuinely from B. Upon the time when A receiving B’s mail, A can use B’s signed certificate to encrypt the replying mail in the future. At the same time, this replied mail also includes A’s certificate which in turn will be used to encrypt that mail.
- When A receives B’s reply, A has to decrypt it with its private key. At the same time, B’s certificate will be imported into A’s mail client software for mail encryption when A writes back to B.
- Client TLS certificate – This certificate is installed either on client mail software or on USB dongle key held by user. User can prove his or her own identity to mail server as if the user is keying in password. When the TLS certificate is installed properly, instead of password, user can also use the certificate on dongle to automatically negotiate with mail server on the fly.
- NOTE: Both SSL certificate and digital signature should be signed by trusted CA such as Verysign or Comodo to be trustworthy. Self-signed certificate issued by mail server or client’s windows operating system has no effect against proving identity. On the other hand, client TLS certificate is issued by mail server itself, for example: EVO Mail Server.
- Once all certificates are properly installed, mails that traverse between mail server, sender and recipient are all protected.
- Any order to follow for certificate installation?
- Install SSL certificate for mail server.
- Once mail accounts are created, issue TLS certificate to mail accounts. Then, users can use TLS certificate to log in.
- When users are writing back and forth with whoever on Internet, they can initiate mail encryption with digital signatures to protect mails.
-
Electronic digital signature – We can obtain such PKI certificate from certificate authority such as Comodo that offers free secure email certificate:
- Digital signature – It is another form of certificate that uses PKI infrastructure to establish a key pair relationship called Public Key and Private Key. Private key is used to encrypted mail content and signature. Public key is used to authenticate and decrypte mail content. The key pair enables us to perform S/MIME digital signature in mail client software such as MS Outlook or Thunderbird.
- Digital signature storage – In major operating systems, such as Windows 10, Mac OS X, iPhone and etc, there is a centralized storage that offers NO Export feature to prevent private key being exported. Theoretically, such key storages should protect keys from being hacked. However, if you lose the hardware itself, then please notify your administrator to revoke that particular key immediately.
- Digital signature portable – There are other types of portable devices, such as USB security token and smart card. Theoretically, these containers cannot be duplicated or exported. Thus, they are also ideal storage for PKI.
-
Client certificate authentication – TLS Certificate makes authentication more robust:
- EVO Mail Server supports TLS Certificate Authentication beside regular password authentication. Once EVO issues TLS client certificate, you can store the certificate in either certificate store of operating systems or USB security token such as below:
- This enhancement of identity authentication has been out there for quite a long time. But, we are not really aware of it. Think of the following scenarios:
- We cash out money with ATM cards, right? Take out your ATM card and you will find a thin chip on the card. That is the certificate offering the same feature as client certificate authentication.
- When we go shopping and slide our credit cards, there are bar code behind the card plus another thin chip. They are actually doing real-time authentication and transactions with bank.
- Government agency gives us a credit-card-sized certificate with a thin chip on top of it for income tax filing purpose.
- In Mission Impossible movie series, password, finger print, retina, voice, and ID card all try to achieve authentication at even higher security level.
- When we walk in New York Wall Street, we see lots of white-collars wearing not only their ID cards but also a USB key next to it. These keys are not just thumb drives. They are actually containers for token keys.
- How EVO Mail Server distributes certificates to users? Please folow the steps below:
- Click on Account tab and open up a user account profile that needs this client certificate authentication implementation.
- Scroll down to User Email Account section
- In Authentication Method section click on radial next to Password or TLS Certificate, TLS Certificate, or Password and TLS Certificate.
- In TLS Certificate, click on Create and then Deliver. Then, a serial number appears in Certificate SN space.
- Ask user to log in his or her mail account and check for an e-mail message from EVO CA for client certificates.
- Match SN in the mail with the SN located in user’s account profile so that a correct certificate is being implemented.
- Save the attachment file of info.P12 that can be imported in compatible mail client software, such as Apple Mail, Thunderbird and Opera.
- For security reason, remind users to delete this email message after saving .P12 file in a safe place for backup.
-
EVO Collaborator Mobile – Enable users to configure their own accounts to some degree as well as document sharing: