Skip to content
Migrate e-mail accounts and their e-mails from old mail server to EVO Mail Server
When a company’s mail server gets old and its performance is poor even after fine tuning, it is about time for IT staffs to consider replacing the mail server. It is a painstaking process moving all the e-mail accounts along with their e-mail messages from the old one to a new one. EVO staffs have thought about this and would like to give you a hand.
-
E-mail accounts migration – EVO Mail Server provides 3 ways to migrate user accounts from various sources:
- EVO’s Account/Password Capturing Mode – Open a temporary unconditional login session to all users for a short period of time:
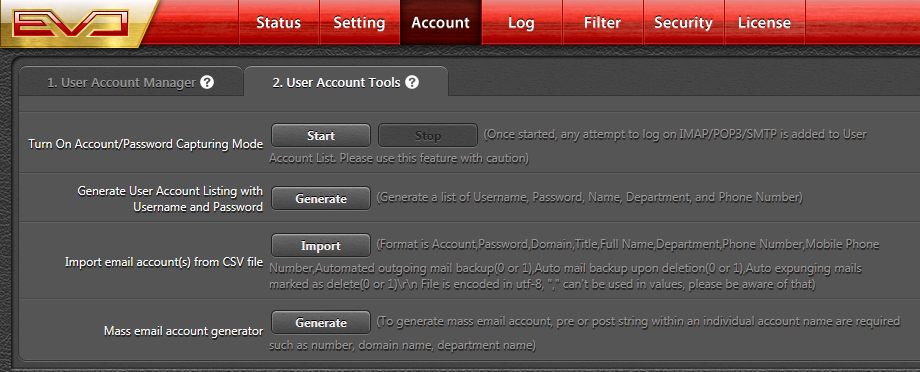
- On Account tab, click on User Account Tools tab.
- Click on Start button
- Notify all users with e-mail accounts to log in with their own username and password within a period of time.
- When time is up, click Stop button to turn off the capturing.
- By now, EVO Mail Server should have usernames and passwords of all e-mail accounts in the company.
- Note: Should any user be unable to log in, make sure the user turn off Encrypted Password and use Plain Password instead.
- Windows Active Directory /Linux LDAP – EVO Mail Server synchronizes with AD and LDAP account lists rather than solely importing:
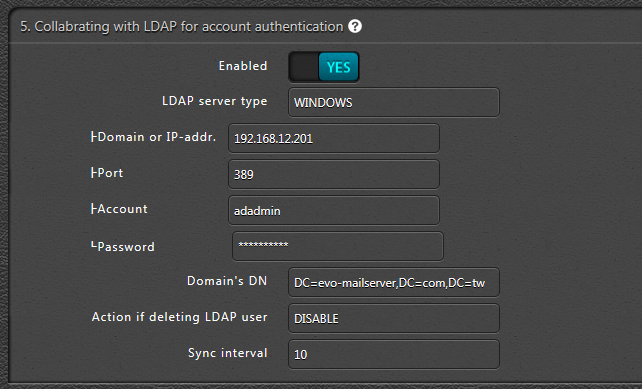
- Click on Setting tab.
- Scroll down to 5. Collaborating with LDAP for account authentication.
- Click the switch and make it YES.
- Select between WINDOWS and LINUX in LDAP server type.
- Enter AD or LDAP server’s IP address in Domain or IP-addr.
- The LDAP default port is 389. If it is different than 389, enter the port.
- In Account and Password fields, enter AD or LDAP server’s administrator username and password.
- In Domain’s DN field, break down your domain’s Distinguished Name as the following example of ldap.yourdomain.com: DC=ldap,DC=yourdomain,DC=com
- In Action if deleting LDAP user, you can either select DISABLE or DELETE local user account when that particular user is deleted on AD or LDAP server.
- In Sync interval, enter a integer value to define time interval that EVO Mail Server synchronizes with AD or LDAP server to update add, disable, delete actions accordingly.
- Import e-mail accounts from CSV file – EVO Mail Server is able to import from a prepared username/password list in CSV format:
- Prepare a CSV file containing the following fields which must not contain “,” and save the file in UTF-8 encoding:
- Account name
- Password
- Domain
- User’s full name
- Department
- Office number
- Mobile number
- Click on Import button.
- Once import is complete, EVO Mail Server is ready to serve.
-
E-mail messages migration – EVO Mail Server provides 2 ways to migrate user accounts’ e-mail messages:
- Use EVO Mail Migration – EVO Mail Server provides a free tool that enables administrator or account owers to perform a FTP-like account-to-account e-mail message transfer:
- Download EVO Mail Migration (EMM) from EVO’s official website.
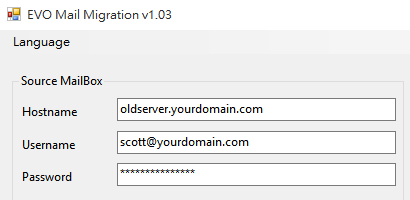
- Install and run EMM tool software
- On Source MailBox side, enter source mail server’s IP or host name, username and password.
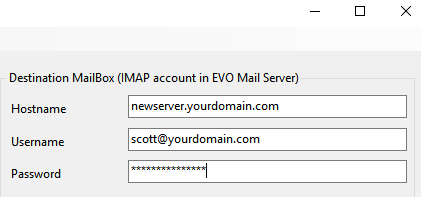
- On Destination MailBox side, enter EVO Mail Server’s IP or host name, username and password.
- Select POP3 or IMAP4.

- Check options according to your needs:
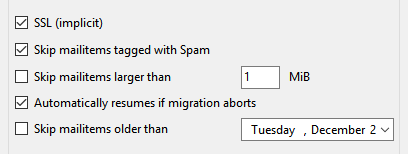
- SSL (implicit) – Make the transfer session in SSL connection.
- Skip mailitems tagged with Spam – Check this to skip spam mails.
- Skip mailitems larger than – Enter an integer value to define upper boundary to be transferred.
- Automatically resume if migration aborts – Like FTP, EMM will pick up where it was left out in case transfer session is broken.
- Skip mailitems older than – Select a date and EMM will skip e-mail messages older than that.
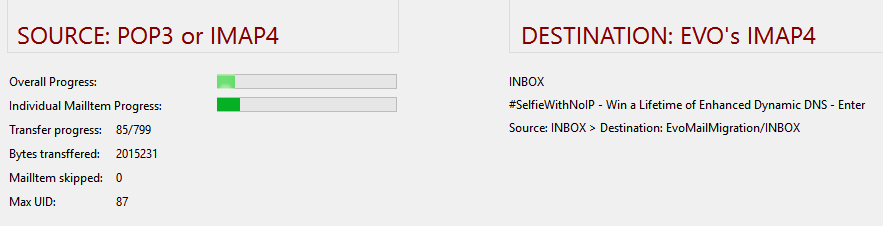
- During transfer session, transferring progress and status will inform users how far has it gone.
- Upon completion, log in user account. There will appear a mail folder called EVOMailMigration where all transferred e-mail messages are located with all the folder structures retained.
- Drag and drop all e-mail messages and folders to appropriate locations in mailbox.
- Import .eml mail dir. into this account – When .eml files of an e-mail account are available, it is possible to directly import them under EVO Mail Server:

- Open EVO Mail Server GUI.
- Click on Account tab.
- Click on an e-mail account to open its editing profile.
- Scroll down to Send tools/Information/notification emails section.
- Click on Import .eml mail dir. into this account button.
- Browse to where .eml files are located to proceed import.