
Sync Google Calendar with Outlook 2016
The tutorial is using Outlook 2016 as an example:
Notes 1: If you sync Android with Outlook, please use the same Google account on both ends and steps below are all the same.
Note 2: If you sync iCloud/iPhone with Outlook, steps are all the same except selecting Profile #2 instead of Profile #6 in step #6. Also, make sure to get an App-speicific password from your iCloud account first.
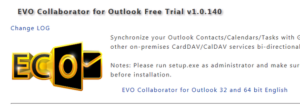
- Browse to Download page and download ECO Add-in. This add-in is a commercial software and is not included in EVO Mail Server.
 Close Outlook if it is opened.
- Run EVO Collaborator for Outlook demo of either 32- or 64-bit.
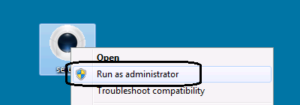
- Run ECO setup.exe with Run as administrator or an installation error will occur.
- The bit-version of either 32 or 64 refers to Outlook rather than the Windows OS. Installing mismatching bit-version of ECO will result application error and the add-in will not work properly. How to check Office’s bit-version?
- During installation, ECO will detect the existence of .NET Framework 4.5.x. If none is found, then an automated .NET Framework 4.5.x installation will proceed.
- Run ECO setup.exe with Run as administrator or an installation error will occur.
- Open Outlook.
- Click on Configure Profile(s).

- Click on profile to the left. This quick startup will use Gmail/Google Calendar as an example
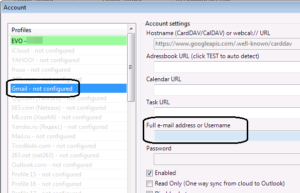
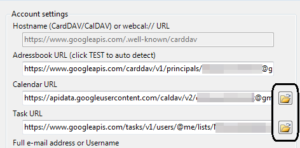
- Shown as above, to the right, enter your CardDAV/CalDAV server name in Hostname (CardDAV/CalDAV) as well as Full e-mail address and Password. (For Gmail, the server host name has a default value and password will be entered in OAuth window instead.)
- Under Sync options, change to Outlook default folders by clicking the folder icon to the right as below: (This setup method is binding your Outlook contacts, calendars and tasks with your Gmail. If you do not wish to do so, then keep the default naming as they are or change names according to your preference.)
- Outlook Default Folder for CardDAV contacts –
- \\Outlook\Contacts
- Outlook Default Folder for CalDAV calendars –
- \\Outlook\Calendar
- Outlook Default Folder for CalDAV tasks –
- \\Outlook\Tasks
- Outlook Default Folder for CardDAV contacts –
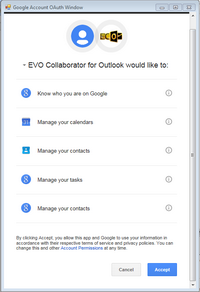
- Click on TEST and there will be a popup window of Google OAuth (Some services, such as Gmail, Outlook.com and Toodledo have this while some does not). Enter password and click Accept to continue. Once authenticated, click on X at top-right to quit popup window.
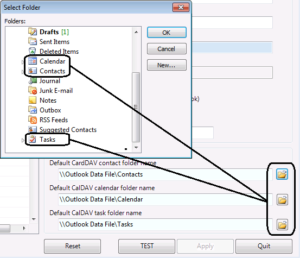
- If your Gmail account has multiple folders to store calendars and/or tasks, then you will see folder icon(s) next to the detected URLs, shown as below. Click on the icons to select among multiple folders within the popup window.
- Once appropriate folders are selected, click on Apply and Quit.
- ECO will initiate a Gmail-to-Outlook synchronization for the first time. Future sync will take place under the following three circumstances:
- After quitting Configure profile(s).
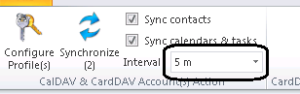
- While running Outlook, sync will take place every 300 seconds unless otherwise specified as below:
- Any data change within folders that ECO is monitoring will trigger a sync event within 7 seconds.
- For all your existing Outlook contacts, calendars and tasks entries, a one-time upload to your Gmail account is required. After the uploads, ECO will start monitoring these items for any change as well and sync promptly.
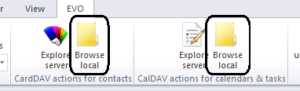
- Let’s start the one-time upload: By clicking either of the Browse local buttons shown as below, there will open a dialogue box where the uploads take place. (We go with uploading contacts first)
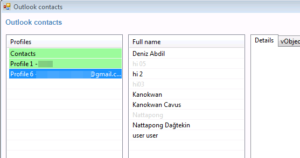
- Click on your Gmail account profile to the left and you will see a list of items. In the middle section. Some of them are in black while some of them are in gray.
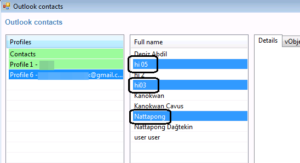
- Use hotkey of Ctrl + G to select all items in gray color. There are two more hotkeys for your convenience: Ctrl + A to select all and Ctrl + B to select items in black color
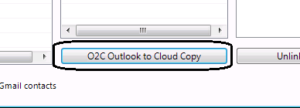
- Click on O2C Outlook to Cloud Copy at the bottom.
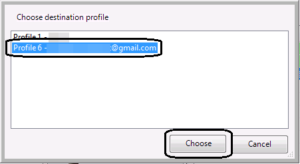
- In the popup window, select Profile 6 – Your Gmail Account and click on Choose to start uploading.
- Now, the contact part is completed and we can repeat step 14 to step 18 to continue uploading calendars and tasks.
By: CJ