Skip to content
EVO Mail Server maintenance
EVO Mail Server requires minimum effort to maintain. All mail archive is located in a centralized folder for easy backup. Software update is a few clicks away. Hardware and software fail-over is quick.
-
EVO license activation and registration – Briefing how to obtain license and registration from EVO software production:
- As soon as your payment is verified, a license key will be delivered via E-mail.
- In EVO GUI, click on License tab and enter license key in space provided next to Activation Key.
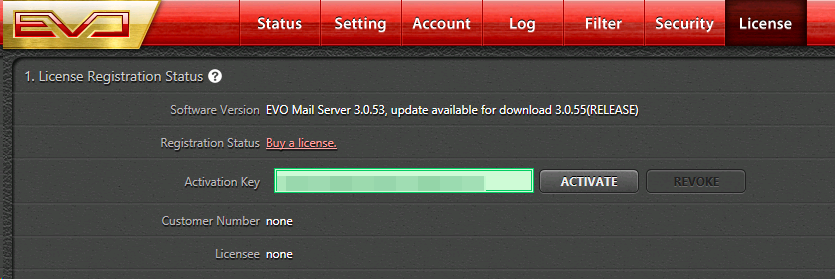
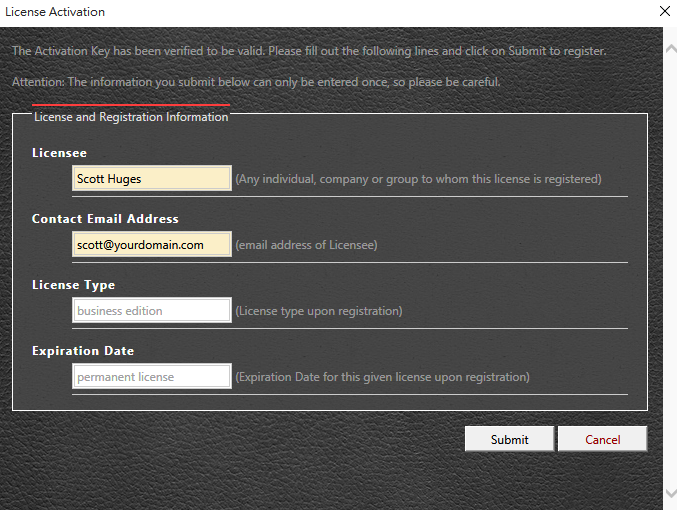
- Click on Activate button and a registration form pops up. Fill in licensee and contact info and click on Submit.
- Once registered, License tab displays this EVO Mail Server installation is properly registered.
-
Backup mail, account and log – Locating mail data and configuration files and back them up:
- Folder location for mail data – If not otherwise specified, EVO Mail Server stores all its data inone of the following folders by default:
- C:\ProgramData\EvoMailServer\ Windows Vista, Server 2008r2, 7, 8, 8.1, Server 2012, 10
- C:\Documents and Settings\All Users\Aplication Data\EvoMailServer\ XP, Server 2003r2
- For backing up all mail data – Copy EvoMailServer folder shown as above to backup everything.
- For backing up user accounts – Refer to usage of Account List Generating Tool.
- For backing up event logs – Browse to EvoMailServer\LOGS folder shown as above and back up the following txt files:
- AUDIT_YYYY-MM.TXT – Account login and logout log
- POP3_YYYY-MM.TXT – POP3 connection log
- SMTP_YYYY-MM.TXT – SMTP connection log
- SYSTEM_YYYY-MM.TXT – Event log for information, warning and error
- For backing up SSL certificate files – Browse to EvoMailServer\CONFIGS\CERTSTORE folder and back up the whole folder.
- For backing up EVO Mail Server’s parameter settings – Browse to EvoMailServer\CONFIGS and back up the whole folder.
- For backing up all mail archives – Browse to EvoMailServer\HOSTS\DEFAULT\ARCHIVE folder and back up the whole folder:
- Within the above ARCHIVE folder, mail archives are sorted into INBOUND and OUTBOUND folders.
- Each of the INBOUND and OUTBOUND folder contains sub-folders such as YYYY-MM\DD. E-mail messages are sorted into a day-by-day fashion for convenient archive retrieval.
- Each e-mail message exists in a standard .eml file format.
- Assign different location for ARCHIVE folder – ARCHIVE folder will eventually grow so huge and it can be relocated to a larger storage of conventional hard disk while EvoMailServer folder should stay in SSD hard disk for the most optimal purpose. Here is how:
- Before relocating, please make sure your EVO Mail Server is v3.0.47 or above.
- Stop EVO mail server and quit EVO Mail Server GUI.

- Browse to EVO Mail Server’s default folder that we mentioned earlier or the folder you assigned during software installation.
- Use Notepad.exe or UltraEdit to open datapath.ini. This file has to be manually created if you have not previously changed mail data location at the bottom of Status page on EVO Mail Server GUI.
- Add one line: ARCHIVE_PATH=. Following the equal sign, enter full archive path that you will assign such as F:\MAILARCHIVE
- Under C:\MAILARCHIVE, create a folder called ARCHIVE, as shown in the above screenshot.
- Save datapath.ini and quit.
- MOVE all files in the original ARCHIVE folder to C:\MAILARCHIVE\ARCHIVE folder.
- Open EVO Mail Server GUI and start mail service on Status page.
- For backing up web mail – Follow steps below to proceed backing up:
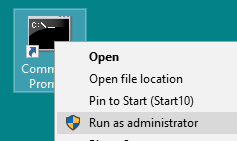
- Right-click on Command Prompt icon and select Run as administrator.
- In Command Prompt console, enter cd c:\EVOServ\.
- Enter serviceremove.bat to remove EVOServ service from system.
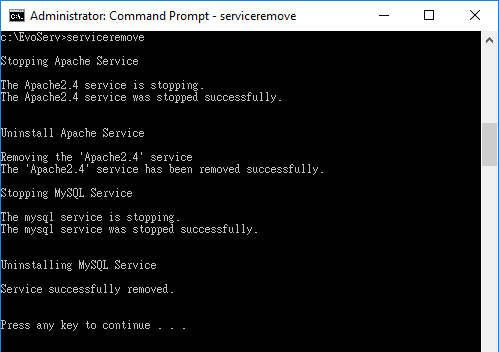
- Once the batch file is done, back up the whole C:\EvoServ\ folder.
-
EVO software uninstall – Instructing how to uninstall EVO software without losing mail data:
- Uninstalling EVO Mail Server:
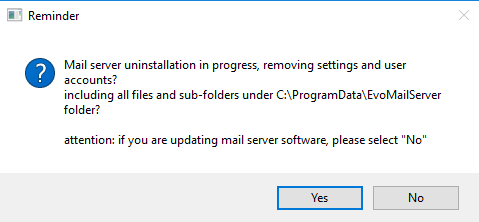
- Before you proceed, make sure you back up all your configuration files and mail data from your EVO Mail Server data folder.
- Stop EVO Mail Server service on top of ‘Status’ tab and close GUI.
- Go to START→Control Panel→Uninstall a program and double-click twice on EVO Mail Server to uninstall.
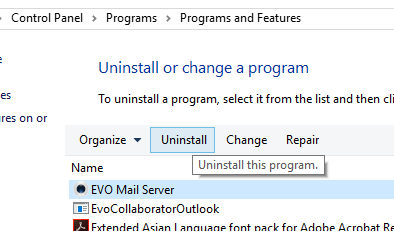
- During software uninstall, answer Yes to wipe out everything including EVO Mail Server configuration files and mail data and answer No to keep everything.
- Uninstalling EVOServ:
- Right-click on Command Prompt icon and select Run as administrator.
- In Command Prompt console, enter cd c:\EVOServ\.
- Enter serviceremove.bat to remove EVOServ service from system.
- Once the batch file is done, the uninstall process is completed. At this point, you may choose to delete C:\EvoServ\ folder or back it up.
- Uninstalling EVO Collaboration Add-on:
- Open EVO Mail Server’s GUI.
- Go to Setting tab and scroll down to 9. EVO Collaboration Add-on: CardDAV and CalDAV Setting.
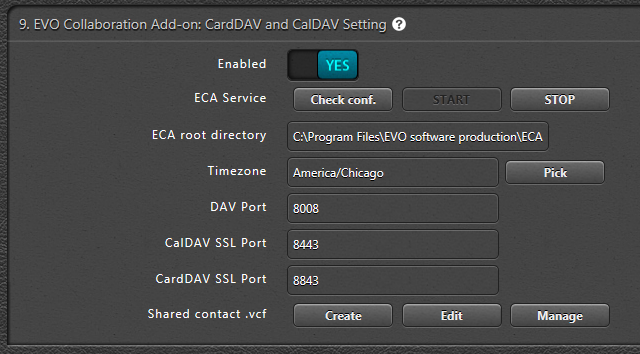
- Click on STOP to change ECA service from START to STOP
- Go to START→Control Panel→Uninstall a program and double-click twice on ECA to uninstall.
-
EVO software update – EVO Mail Server notifies you whenever an update is available:
- Update EVO Mail Server:
- When you see a newer version on EVO Official site or an update reminder at top of License tab, download the .msi file.

- Stop EVO mail service by clicking on STOP at top of Status tab.
- Quit EVO Mail Server.
- Follow Uninstall EVO Mail Server to proceed uninstalling older version.
- Install newly downloaded .msi file.
- Once installation is complete, double-click on EvoMailServer icon on desktop.
- Start EVO mail service by clicking on START at top of Status tab.

- Update EVOServ:
- Follow Uninstall EVOServ to proceed uninstalling older version.
- Download the newest Evoserv.zip and extract it to C:\.
- Right-click on Command Prompt icon and select Run as administrator.
- In Command Prompt console, enter cd c:\EVOServ\.
- Run serviceinstall.bat.
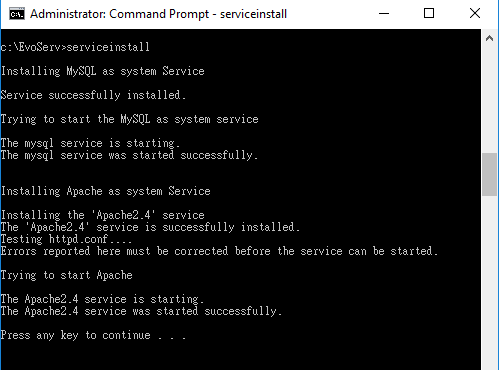
- When the batch file is complete, EVOServ installat ion is also complete
- Update EVO Collaboration Add-on:
- Follow Uninstall ECA to proceed uninstalling older version.
- Download the newest ECA from EVO official site.
- Install newly downloaded .msi file.
- Open EVO Mail Server GUI.
- Go to Setting tab and scroll down to 9. EVO Collaboration Add-on: CardDAV and CalDAV Setting.
- Click on Check conf. and a result window will pop up.
- Click START to initiate ECA service.
-
EVO Mail Server software license transfer – Swift license transfer facilitates your server recovery and contingency plan:
- Go to License tab page and click on Revoke button next to Activate.

- Click Yes at prompt to continue and a revoke notice follows.
- At this point, this activation key can be used to activate another EVO Mail Server installation elsewhere.